
|
|
#1
 06-01-2009, 11:59 PM
|
|||
|
|||
|
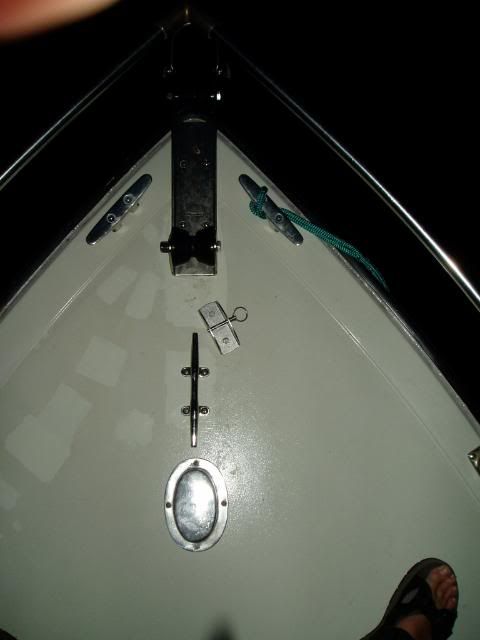
Decided to follow FredH's lead and move anchor off deck on to a roller bracket. Finally got the new anchor bracket installed that I picked up down at Dania flea market. It's rated for a 65 lb anchor, so it's a bit of overkill for my dinky 9# anchor, but for $40 I figured it was well worth it.
Here's the old setup, with anchor chocked on deck. 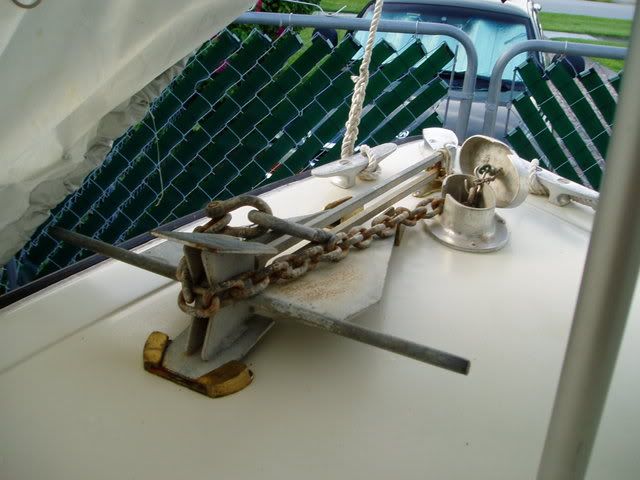 Also picked up some nice LED lights to put on cabin sides to replace the combo bow light. 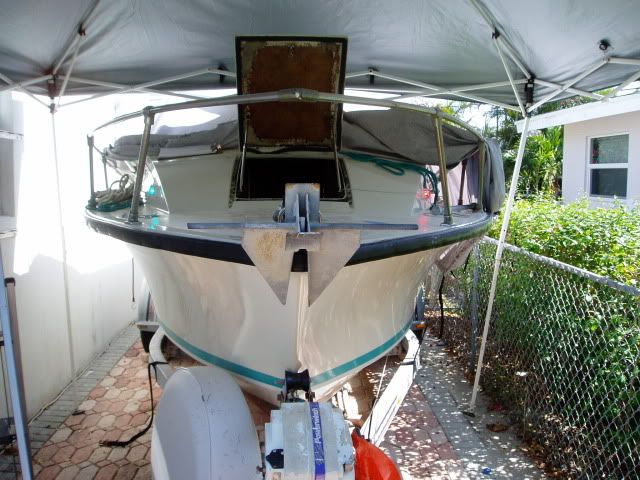 New setup. Underside of deck was reinforced with 2 layers of 3/8" plywood/epoxy-cabosil beneath the center cleat/bracket and an additional 1/2" plywood underneath bow cleats. Will also allow mounting a windlass up there if I get too old or lazy to haul the anchor myself!  Was surprised that there were no backing plates underneath the bow cleats! Was surprised that there were no backing plates underneath the bow cleats! 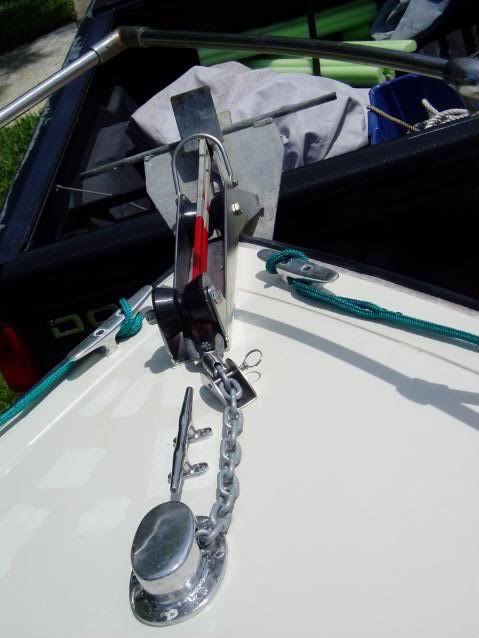 Bracket has ears on it below the front roller that keep the flukes from bouncing up and hitting hull in rough seas. Also went to 20' of anchor chain to improve chances of anchoring offshore with only 300' of anchor line. For shallow water, just let out the chain, and that anchor is REALLY planted! 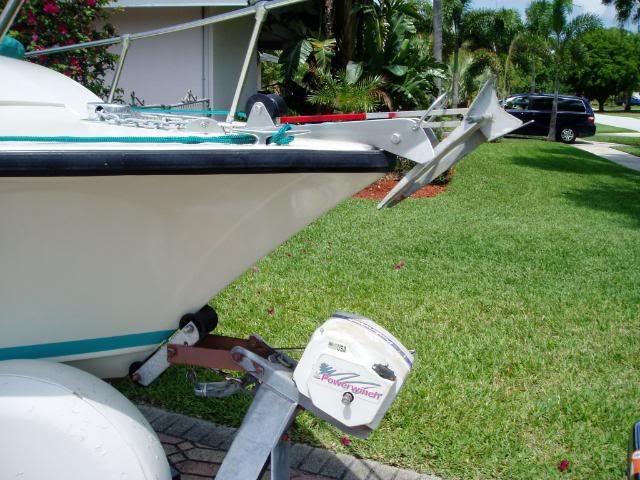
__________________
'72 SeaFari/150E-Tec/Hermco Bracket, owned since 1975. http://i188.photobucket.com/albums/z...Part2019-1.jpg 
|
|
#2
06-02-2009, 02:34 AM
|
|||
|
|||
|
Thanks for sharing, Denny. Looks nice. No plates backing the aft cleats, either. I'll change that before towing or getting towed - God willin'...
Can you post or send some pics from directly overhead and underneath so I can view your bolting pattern and backing board design? Told sis in JAX I might come see her kids this Sept or Oct so I might try to work trip around the 'cotee R gathering. I made some charts of the area a few years back and would love to see if my GPS nos. are productive. Sep-Oct is probably very good fishing there...hopefully a few yankee snook still hanging around with the reds, and find some gags on the reefs... gettin all giddy...
__________________
there's no such thing as normal anymore...
|
|
#3
06-02-2009, 09:28 AM
|
|||
|
|||
|
Denny,
Looks great..that IS a beefy roller setup!!!! sure did get rid of the clutter... I need to get a different anchor...my flukes dont pivot enough compared to your anchor...you have quite a bit of clearance between flukes and underside of bow. I should have kept my bow cleats too Again great job! Hope to meet up soon -FRED
__________________
"...Southern by the grace of God"
|
|
#4
06-02-2009, 10:01 AM
|
|||
|
|||
|
Nice set up. What brand of anchor is that? I like the groved shank feature for a sliding ring. I havn't seen that on any danforth type anchors. I use a sea cure 13# rigged break-away with zip ties.
__________________
" I'm the one thats got to die when its time for me to die; so let me live my life, the way I want to". J. M. Hendrix
|
|
#5
06-02-2009, 10:58 AM
|
|||
|
|||
|
Denny, Nice work! After the Keys trip and pulling that anchor, I can appreciate the benefits of that improvement.. I too would like to see the underside structure.
__________________
Snookerd
|
|
#6
06-02-2009, 07:23 PM
|
|||
|
|||
|
Nice work Denny! I did that same thing about 5 years ago.
 Nav light outlined in orange:  Great minds think alike
__________________
Common Sense is learning from your mistakes. Wisdom is learning from the other guy's mistakes. Fr. Frank says: Jesus liked fishing, too. He even walked on water to get to the boat! Currently without a SeaCraft  (2) Pompano 12' fishing kayaks '73 Cobia 18' prototype "Casting Skiff", 70hp Mercury
|
|
#7
06-03-2009, 05:36 PM
|
|||
|
|||
|
Hey Denny, very nice!!! It's the same set up I have except the aft roller which is a simple way to keep the rope and chain level to your deck inside the stainless. The only thing I see with this that might need improvement is I don't see a "safety line" to the anchor lock pin....I would have that skipping across the deck falling 200' straight down in a second!! Take care.
|
|
#8
06-04-2009, 01:14 AM
|
|||
|
|||
|
[QUOTE]
.. What brand of anchor is that? I like the groved shank feature for a sliding ring. I haven't seen that on any danforth type anchors. [QUOTE] Don't remember for sure as I've had it for about 30 years, but I believe it's a Hooker. It seems to be one of the better sliding ring anchors. The best sliding ring anchor I've ever seen is a Benson, which is mostly all cast steel. Most sliding ring anchors appear to be very cheaply made and I wouldn't trust one for any serious anchoring. I used to have a Benson but lost it trying to do an anchor dive in 4' seas on the old Amarylis off Singer Island . . . DUMB move! Very difficult to anchor dive here because of current; should have done a float dive and just drifted over it! Unfortunately I managed to bend the shank on that anchor yesterday!   Near as I can tell, I think the boat was still moving forward when I dropped it, and with 20' of chain, it REALLY digs in quick. When wind/current took over, looks like it pulled the shank backwards; surprised the ring didn't slide and just pull it out. I believe it's just cheap low carbon steel, which yields at about 30-35,000 psi. Looks like the tensile side of shank yielded (bent) and the other side that was in compression simply buckled. Ran some quick numbers and it would only take about a 150 lb load to bend it, which I think a 2800 lb boat could easily generate. Looking for a shop that might be able to straighten it. I don't have the tools to put that much load on it.
__________________
'72 SeaFari/150E-Tec/Hermco Bracket, owned since 1975. http://i188.photobucket.com/albums/z...Part2019-1.jpg
|
|
#9
06-04-2009, 02:11 AM
|
|||
|
|||
|
Quote:
 Bottom View 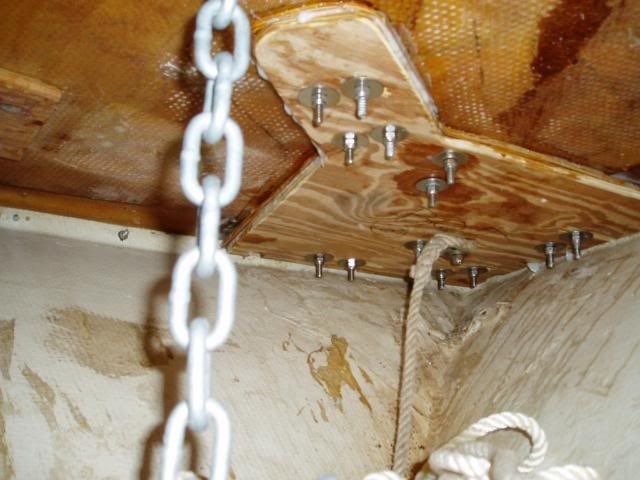 If you're gonna do this, first pull out the plywood bulkhead between anchor locker and cabin for better access, as it's a long reach up to those cleats and bow light! I used some HD aluminum foil to make a "mold" of raised underside of toe rail area to determine thickness needed for cleat backer boards that would make them flush with rest of deck. 1/2" plywood was perfect. The deck has a fair amount of crown in it, so needed a couple of thinner 5/16" pieces that would conform to it. They're basically 15" squares with an extension on aft end to cover the center cleat area. All holes in cored deck were drilled oversize, filled with thickened epoxy and then re-drilled to required size. Wood got one coat of epoxy, then a layer of thickened epoxy on top to bond it to deck or previous layer. Used bolts sprayed with WD-40 in the holes to hold wood pieces to underside of deck till epoxy cured. Also used wedges and a bottle jack to force 15" squares to conform to crowned deck. The wood pieces were installed in 3 separate steps over 3 days to let epoxy cure and redrill holes before installing next layer. Used fender washers under all nylock nuts. The whole deck is real solid now, although it had no soft spots before! Should easily hold a windlass if it's ever needed. Gillie, if you ever tow some one, just use the towing eyes in the transom, not the deck cleats. I have 20' lines hanging on each stern cleat with snap hook on one end snapped to towing eye, with an eye spliced in other end. Then just uncoil the two lines to make a bridle that the towee can hook to. If you're being towed, for our Bahama trips, we used to run the anchor line down thru a carribiner hook or shackle on the bow eye and then back up to the deck with a snap hook on end of it; if you need a tow, just hook to bridle on companion boat. If you're towing offshore and the seas get big, you want a looong tow line so it has some stretch to it to accomodate the shock that will occur when the boats get out of phase with the waves, ie., when tower is going down face of a wave while towee is trying to climb up backside of a wave. With that set-up you can rig to tow or be towed very quickly. This can be a significant safety factor because Murphy says that when you do break down, it'll be in the middle of a thunderstorm with rain coming in sideways and blowing like hell!
__________________
'72 SeaFari/150E-Tec/Hermco Bracket, owned since 1975. http://i188.photobucket.com/albums/z...Part2019-1.jpg
|
|
#10
06-04-2009, 08:48 PM
|
|||
|
|||
|
Denny, thanks for posting pics and the advice, too.
Still working on the scuppers let them dry all week and now debating how much wood to chew away and what tool to use. I cleaned the wood up with a 1" brass pipe brush I stuck in a in a drill. I kind of want to leave the glass holes intact and just fill the existing open wood pores with straight epoxy, followed by a thickened filler/fairing coat on the inside of the holes before inserting the 4200 saturated brass tubes and flaring. I keep thinking I want to seal them up but get hung up on that because then the wash-down drainage becomes an issue.
__________________
there's no such thing as normal anymore...
|
 |
|
|


 Linear Mode

