
|
|
#1
 06-23-2008, 08:10 PM
|
|||
|
|||
|
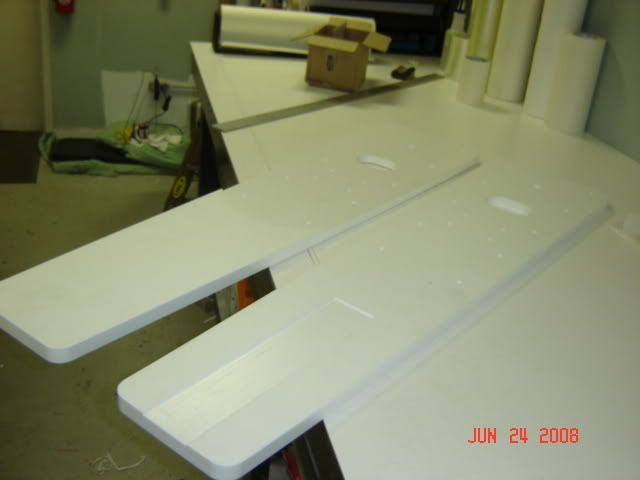
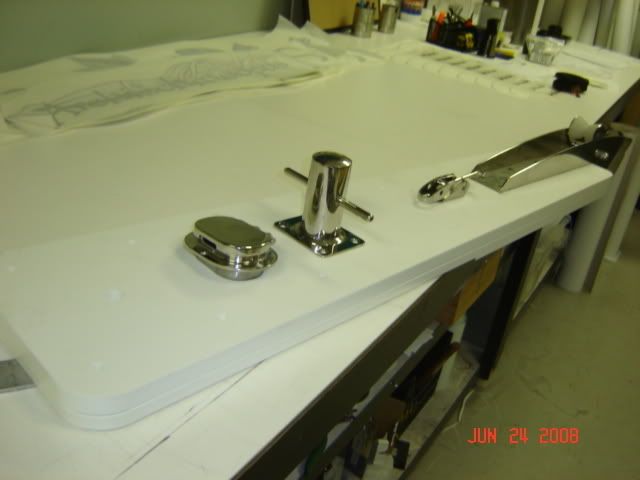
Our gameplan is to router 2 pieces of 1" StarBoard - gluing them together and adding a 1/2" PVC backer in the anchor locker. Everything thru bolts except the anchor light - and we are building it up on a 4" hollow pedestal so lightbeam can clear bit and anchor. We are using a Fortress FX-11
anchor with 12' of 3/8" SS chain and a 3000lb swivel attached to a thimble to 600' of 1/2" braided nylon line. It all ties up to a SS bit and dumps into the locker through a SS hawse. 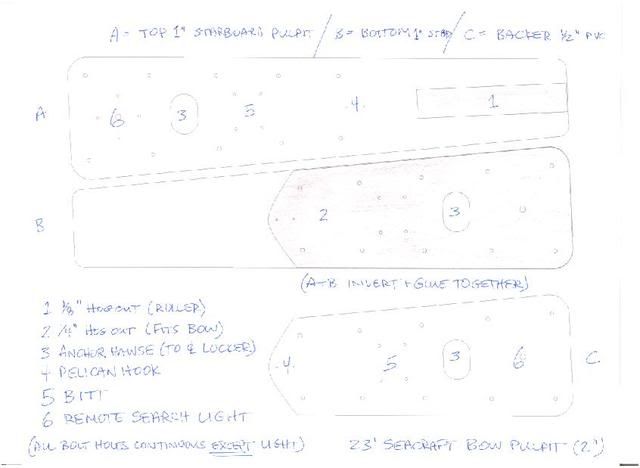 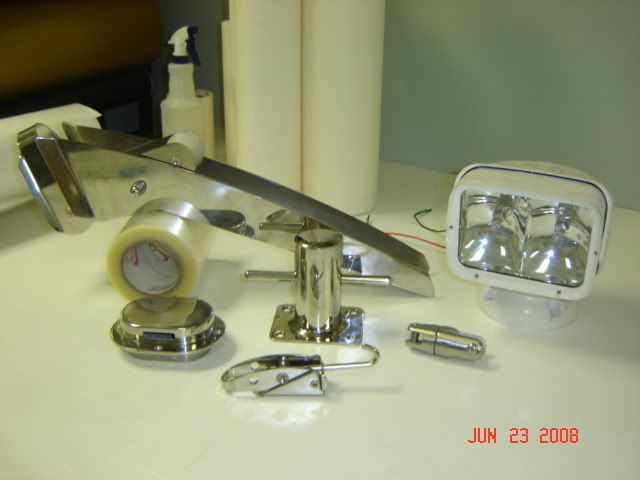
__________________
"The sea is selective... slow at recognition of effort and aptitude, but fast at sinking the unfit" ...Felix Riesenberg 
|
|
#2
06-24-2008, 07:13 AM
|
|||
|
|||
|
Being that I am a novice here, my question is gluing together?
I always thought that starboard can't be glued. Or needs a special glue and that it still is not a good product to glue.
__________________
[SIGPIC][/SIGPIC] "If You Done It...It Ain't Braggin" my rebuild thread: http://www.classicseacraft.com/commu...ad.php?t=18594
|
|
#3
06-24-2008, 07:38 AM
|
|||
|
|||
|
I wasn't sure either about bonding StarBoard until I asked a personal friend that builds locally and claims it's legit. I ripped off the info from the King StarBoard site for everyone to read... I am also thru-bolting which should not weaken it.
It is preferable to mechanically fasten StarBoard but when an adhesive is necessary you can use a product called #7540-AB or 3M's Scotch-Weld DP-8005. We do not represent these products, make any claims about their abilities or except liability for them. We have however used them with success and had good response from others who have used them. #7540-AB is sold by Adhesive Methods and Technologies, Memphis TN Phone 901-367-1335 Fax 901 367-1308. Ask for Larry Doring. How Should StarBoard® Surfaces be Prepared? The surfaces to be bonded should be lightly abraded with a medium grit sandpaper before cleaning the surfaces with acetone, Toluene, or alcohol. StarBoard should then be flame-treated on the entire surface to be bonded with a propane torch. Pass the flame over the surface at a distance of approximately 1" to 2" so that the blue (oxidizing) portion of the flame is touching the surface of the StarBoard at a rate of approximately 12" per 3 seconds. There should be no scorching or visible difference in the surface appearance when properly treated. Ideally, the surface prep should be performed within one hour of the bonding process. Make sure to flame treat in a safe well ventilated area.
__________________
"The sea is selective... slow at recognition of effort and aptitude, but fast at sinking the unfit" ...Felix Riesenberg
|
|
#4
06-24-2008, 07:48 PM
|
|||
|
|||
|
We routered the two pieces today and we will order the glue tomorrow. We will photograph the process of bonding as we do it.
__________________
"The sea is selective... slow at recognition of effort and aptitude, but fast at sinking the unfit" ...Felix Riesenberg
|
|
#6
06-24-2008, 09:20 PM
|
|||
|
|||
|
We were discussing that this evening... what do you think about an aluminum plate sandwiched between the StarBoard?
__________________
"The sea is selective... slow at recognition of effort and aptitude, but fast at sinking the unfit" ...Felix Riesenberg
|
|
#8
06-25-2008, 01:56 PM
|
|||
|
|||
|
With your router just route out an inset in the starboard and that aluminum plate should drop right in and be a clean installation.
Thanks for the starboard gluing tip. You noticed I did say novice. 
__________________
[SIGPIC][/SIGPIC] "If You Done It...It Ain't Braggin" my rebuild thread: http://www.classicseacraft.com/commu...ad.php?t=18594
|
|
#9
06-25-2008, 08:56 PM
|
|||
|
|||
|
I definately learn something daily. I'm a novice myself and consider this is a great site for learning. I have spent countless hours reviewing years of posts and replys. Reading and learning about these amazing boats and what their owners have done to them - from resurrection of the dead to waxing and detailing the freshwater time capsule is very enjoyable to me. The bad part is once I cut a pattern on my router, I have no way to re-home it in the same place!
__________________
"The sea is selective... slow at recognition of effort and aptitude, but fast at sinking the unfit" ...Felix Riesenberg
|
|
#10
06-26-2008, 08:53 AM
|
|||
|
|||
|
Looks like from your picture you are (were) using a sign router.
I was referring to a hand plunge router. All you have to do is make a template on one of the pieces of where the plate should go. Then use the hand router. If you don't have one...I am sure there is a friend out there someplace that has a plunge router.
__________________
[SIGPIC][/SIGPIC] "If You Done It...It Ain't Braggin" my rebuild thread: http://www.classicseacraft.com/commu...ad.php?t=18594
|
 |
|
|


")
 Linear Mode

