 |
|
|
|
#1
|
|||
|
|||
|
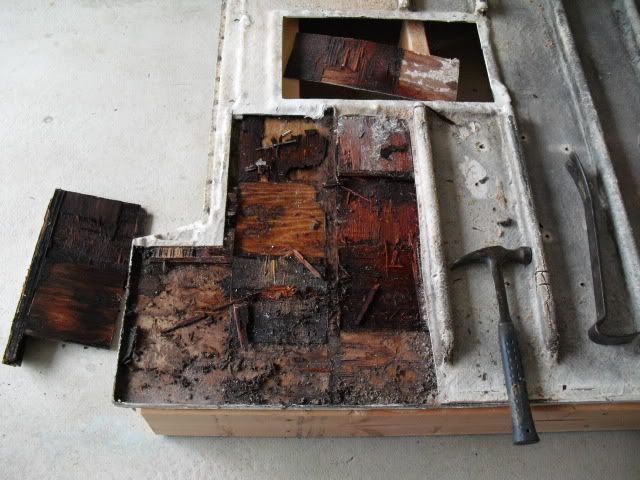
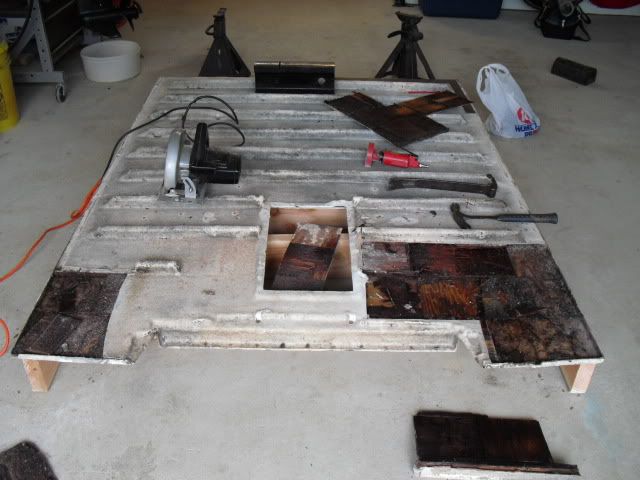
Pulled the floor section on my 23' Inboard. It is approximately 5' x 6' and spans over the two gas tanks. The outer skin is fine so I am just redoing the bottom.
I can probably match the way this was done- 3/4"plywood ribs and plywood squares. My question is- Is there a better way to construct this with contemporary products? Am I better off making the ribs out of hard wood? Should I use divinycell? What product should I use to attach the plywood or divinycell? When all is said and done it has to span the 5 foot to the other side without touching the tanks. I'm sure some of you guys have done this and I appreciate your input- trying to post images....don't know what I'm doing wrong. [image]http://i749.photobucket.com/albums/xx135/Fred246/Floor2.jpg?t=1267483938[/image] [image]http://i749.photobucket.com/albums/xx135/Fred246/Floor1.jpg?t=1267484982[/image] [image]http://i749.photobucket.com/albums/xx135/Fred246/Floor1.jpg?t=1267484982[/image] |
|
#2
|
|||
|
|||
|
That is kinda broad, there is alot more to it than that, obviously you cut the deck out? How do you plan on putting it back down? Composites are the way to go (IMHO) but $$ may be an issue. You should decide which way you want to go, then someone can help. As far as posting pics go. Go to the pictures thread, follow the top thread.
|
|
#3
|
|||
|
|||
|
On my 23 inboard the deck over the tanks is screwed down - no cutting that I'm aware of. Unscrew it and lift if out. I've never done it but it seems pretty straight forward.
You might want to follow the thread I think it was Strick's floor replacement in his new project. He did a total rebuild of the floor in his. Cut out the back and follow his example. If I remember right mine has ribs that the deck sits on for support. |
|
#4
|
|||
|
|||
|
[image]http://i749.photobucket.com/albums/xx135/Fred246/Floor1.jpg?t=1267500014[/image]
Thanks for your response- it is a removable section of floor-originally done (on the bottom)with 3/4 " plywood ribs on end and roughly 6" x 6" square plywood then glassed over. I followed chucks photo advice step by step, but still not working don't know what I am doing wrong. |
|
#5
|
|||
|
|||
|
Yeah, I have it out and on a frame right now. Strick is amazing and making the whole floor- I'm saving the skin and plan on rebuilding the bottom. Wish I could get the photo up.
|
|
#6
|
|||
|
|||
|
I rebuilt this same floor /hatch on my inboard last spring. I pulled all the old plywood out and replaced it with 1/2" plywood squares ala Strick. Glassed over it with a layer of 1708. I beveled all the edges at a 45 angle so I could completely encapsulate the plywood. Originally some of the plywood edges were exposed which allowed water to rot out the plywood. So far so good --
|
|
#7
|
|||
|
|||
|
Let me help with the pics, gotta get rid of everything past the ".jpg"
 
|
|
#8
|
|||
|
|||
|
Here you go Fred. Just left click on the bottom dialogue box of each foto when in photobucket. It will flash "copied" then switch to CSC post and paste. [IMG] before "http:" and [IMG] immediately after ".jpg"
[IMG]http:examplei749.photobucket.com/albums/xx135/Fred246/freds/floorjibberish.jpg[IMG] Good luck with the floor.  
__________________
there's no such thing as normal anymore... |
|
#9
|
|||
|
|||
|
Thanks for the help with the photos! Think I got it.
Mine was a victim of water coming in the edges and the floor turned into a sponge. Deepsushi- Did you put ribs back in on yours or just the plywood squares? Are there materials that would keep the floor lighter and stronger? Looks like I have a day or two of work just cleaning this up. [image]  [/image] [/image]
|
|
#10
|
|||
|
|||
|
I just went back and review pics of my inboard project and here's what I remember. When recoring I asked about the squares as well and did not go that route. I used Peske board (which is good IMO) and did not cut it into squares. What happened was I would get small air voids no matter how hard I tried to evenly squeeze the pieces together. Then I cut a grid pattern 3/4 the way through the material to make it shape better. If I were to do it again I would consider the grid or squares. With the squares you are more likely to get the air out and form better to the shape of your skin (like tiling). Mine had mahoganney~ strips laying over the fuel tanks for struts. It did not go back together this way! P.S. Check your tanks.
|
 |
|
|