 |
|
|
|
#1
|
|||
|
|||
|
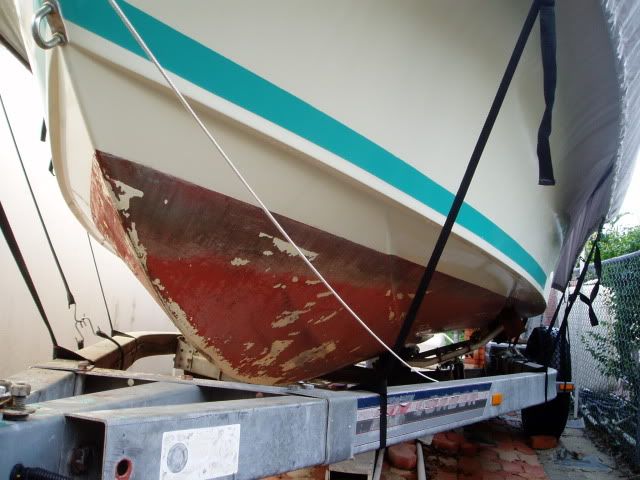
Finally got the ugly bottom paint, that's been on my boat since new, removed and redone. Boat was 3 yrs old when I got it, and previous owner evidently put another coat on every year. By end of last year, much of it had peeled off, clear down to gel coat in many spots, making a VERY rough bottom.
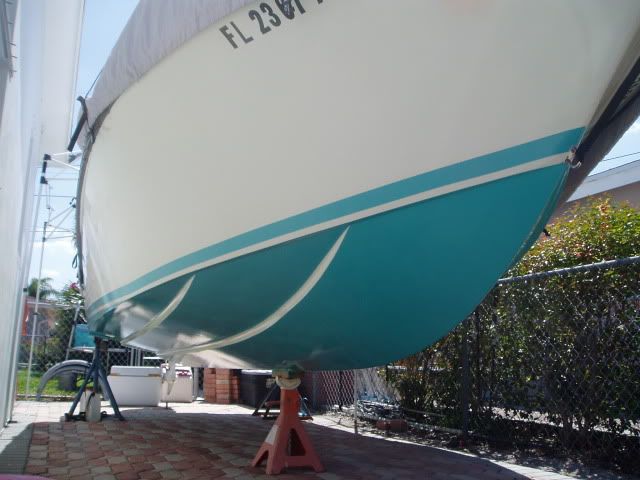
 Planning to circumnavigate Florida next month via Okeechobee waterway, Ft. Meyers, Everglades City, Flamingo, Key Largo, and back up the ICW to Palm Beach area, a distance of about 600 miles! Will probably burn 150-200 gallons of gas, so figured out I'd better get that bottom a little smoother! Here's the final result. As an attempt to pay homage to Carl Moesly and his original SeaCraft prototype "Si-Vad" that he raced before designing the 21, I decided to use a similar paint scheme, using contrasting colors to highlight the vertical steps on the variable deadrise hull. These are the key features which make such a superior hull design, so thought it would be pretty neat to make them stand out, and create a unique look in the process.  Will include a couple of slide shows below for anyone interested in the gory details. Had the hull soda blasted, which created more distress to the bottom than I expected and created a lot of extra work. Went that route because everyone I've talked to that's gone the chemical stripper/sanding route said they'd never do it again! The soda blaster left 3 spots of paint where the boat sat on the stands, so I stripped those areas and part of the old bootstripe using Interstrip (wanted to raise stripe at stern, which sits 1-2" deeper in water since addition of bracket and bigger motor). It worked pretty well, and I think that stripping/sanding is a lot less work (and cheaper!) than the prime/sand/fill/sand routine you'll be doing if you soda blast! Anyhow I applied Interprotect barrier coat because the gel coat was REALLY porous after blasting, and figured that stuff would also fill some of the low spots. Interlux says to apply one coat, apply filler and fair, then apply rest of the primer. It's a great primer and sands easily, IF you don't let it sit too long. (Skip warned me that if you let it sit for a week, it's like sanding a rock!) For that reason I only primed what I could sand down in a couple of days, so did the keel panels, filled and faired them, then primed keel and center panels, etc. Decided to go with Signature Finish after leaving a test panel in the salt water for over a month with NO deterioration. It's the only urethane I know of that will hold up underwater for more than a few days, plus it's easily REPAIRABLE, which I think is very important for any boat you're actually gonna USE! I had used the paint for the bootstripe before and it's definitely designed for the do-it-yourself market. Although it uses a catalyst, it will keep overnight once mixed if you keep it in a tightly sealed container! Shelf life unmixed is maybe 10 years, except for the catalyst, which you'd better keep in the fridge. It can be sprayed, brushed or rolled, and can be wet sanded/buffed to a very high gloss. I used a roller and tried just wet roller alone, and wet roller/dry roller method using Whizz Ultra Smooth and High Density foam rollers. The High Density rollers leave lots of bubbles, but that's not a problem with wet/dry roller method. The Ultra Smooth roller seemed to leave a little more gloss and a little more orange peel; the high density foam rollers seemed to leave a smoother surface with a little less gloss but with less orange peel, so it may be the best method for topside if you plan to follow up with buffing. I don't plan on buffing the bottom! Here are some links to some slide shows/boat porn with more pics/detail on what was about a 3 month effort. One thing I did that simplified the job was to prime/fill/fair/sand/paint 3 spots where I planned to put the boat stands BEFORE I removed boat from trailer. The aft rollers are about 8" inboard from chine at transom, and there was a 2-3' section about 10' from transom, so those areas were easily accessable. One other thing I'd recommend is to spend some $ up front and get yourself a good creeper! I got one called the "Bone/RoughRider" with 5.5" dia. wheels, and it rolls easily over extension cords, gravel and the notches in my brick paver driveway. Soda Blasting All you ever wanted to know about soda blasting! Transfer, trailer to boat stands I lowered nose wheel of trailer, put stand under transom, tied towing eyes to fence posts, hooked the winch pulley that normally hooks to bow eye to a chain wrapped around trailer front cross member, and hooked end of winch cable, that's normally attached to winch stand, to hitch on truck. Then just hand cranked the winch and supported keel with a floor jack as it came off the rollers, alternating jack stand and floor jack under keel to clear trailer cross members. This was overkill, as the nylon bushing/aluminum shaft rollers on the EZ Loader trailer have such low friction that I could just pull the trailer out from under the boat by hand after about the first 5 feet! Priming/Sanding/filling/more sanding etc Speaks for itself! Enjoy, Denny
__________________
'72 SeaFari/150E-Tec/Hermco Bracket, owned since 1975. http://i188.photobucket.com/albums/z...Part2019-1.jpg |
|
#2
|
|||
|
|||
|
That looks cool Denny! Nice work. I really like the way it sets off the VDR. I remember reading about Moesly's intent, not sure but I think "The Amazing Mr Moesly" article, either here or on Carla's www.moeslyseacraft.com
Not as extreme as Brian's 21 but same kind of cool...  Hopefully one the Seavette will get that treatment 
__________________
there's no such thing as normal anymore... |
|
#3
|
|||
|
|||
|
That soda blaster looks like he's ready for a NASA mission. Did you make those round PVC pipe sanders? I hate to copy cat but I just might do the step painting thing when the time comes.
strick
__________________
"I always wanted to piss in the Rhine" (General George Patton upon entering Germany) |
|
#4
|
|||
|
|||
|
Quote:
__________________
Getting home is more important than getting there! Plan accordingly! |
|
#5
|
|||
|
|||
|
Beautiful job,Denny. Now the bottom looks as good as the top.
Dave
__________________
Blue Heron Boat Works Reinventing the wheel, one spoke at a time. |
|
#6
|
|||
|
|||
|
Hey now that you are such a expert when you come over next month bring all your gear and "SHOW ME" how its done on the 21'
  
__________________
[SIGPIC][/SIGPIC] "If You Done It...It Ain't Braggin" my rebuild thread: http://www.classicseacraft.com/commu...ad.php?t=18594 |
|
#7
|
|||
|
|||
|
Quote:
I think that the poor visibility through that helmet is one reason they do so much damage to the gel coat. About all they can see is whether or not there is any paint there! I did notice that the stbd side, which was facing the early morning sun, was a little better than the port side that was in the shade. Yes, I made those sanding tools from PVC pipe and some cheap handles from HD. I got a roll of 2 3/4" adhesive backed 180 grit sandpaper, and it covered just about half the circumference of the pipes. The long one is 1 1/2" schedule 80 PVC, about 1 5/8" OD, and it contacted most of the radius on the steps, but missed a small area near the center. The short one is a piece of sink drain pipe, about 1 1/2" OD, and it covered the center of the radius the other one missed. Worked well on the 20 but you might need a different size for the 25. I let the edge of a DA sander run into the radius from the flat, and that defined the radius runout pretty consistently for masking top edge of stripe. Running a flat board sander along the bottom edge of the steps at a 45 degree angle helped define the lower edge for the stripe. I used a drafting compass and straight edge to mark the upper edge of the stripes on the steps. I used the expensive 3M vinyl masking tape which leaves a good clean edge if you press it down good, and it stretches around curves real well. I think the scheme would look even better on the deeper hull and steps of the 25, 23 and 21 hulls, and I'm indeed flattered that you would consider it! I think Moesly had a good idea with that paint scheme on the prototype hull, and I'm sure he won't mind if we copy it! Denny
__________________
'72 SeaFari/150E-Tec/Hermco Bracket, owned since 1975. http://i188.photobucket.com/albums/z...Part2019-1.jpg |
|
#8
|
|||
|
|||
|
Denny.. Great Job...looks beautiful!!!!
Many will benefit from your excellent documentation of your latest project... including myself! Another one printed out for my Seacraft how to file!! What's next for the Restless Lady III...a well deserved voyage! -Fred
__________________
"...Southern by the grace of God" |
|
#9
|
|||
|
|||
|
Quote:
Enjoy the adventure. When I was 12 and 13 I got to go to an Outward Bound type of camp, but more old school. I was chosen to go on consecutive 70 mile canoe trips North of Montreal. Loved the beauty and pristine water. The fishing was also great for kids. The Portaging, not so much. The third day we saw no other people and that continued until the sixth day. Enjoy the ride, GFS |
|
#10
|
|||
|
|||
|
Thanks Gillie - here's the photo of SI-VAD on Carla's web site Si-Vad That paint scheme would look sharp on your Seavette! Denny
__________________
'72 SeaFari/150E-Tec/Hermco Bracket, owned since 1975. http://i188.photobucket.com/albums/z...Part2019-1.jpg |
 |
|
|