
|
|
#1
 12-18-2006, 12:15 PM
|
|||
|
|||
|
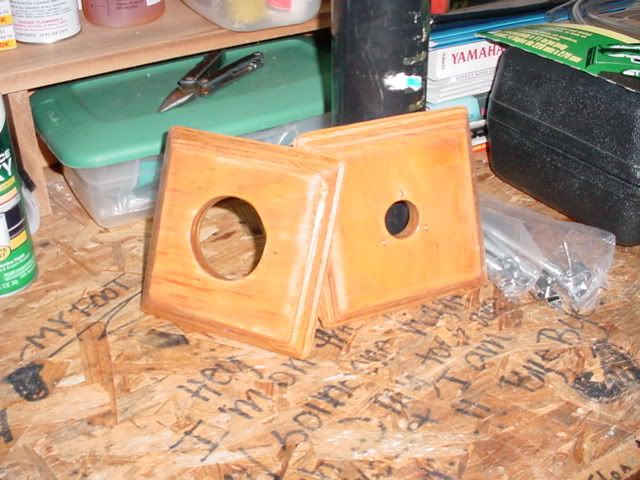
I intend to thru-hull mount a high-speed bait well pick-up and transducer. I have made reinforcment plates from 3/4" plywood and 3 layers of epoxy. Should I glass them down and if so using what layup?? or should I just "glue" them with 4200?? The bait well pick-up will have a true sea-cock above. Here's a pic of the blocks....the small holes were from nails so I could epoxy both sides and will be covered by the fittings.

|
|
#2
12-18-2006, 07:04 PM
|
|||
|
|||
|
Ha Realescape1
I did not take any pictures of what I did but I will try to explain it for you. On the salt water scoop I didnt use any backing plate you can just drill the hole through the bottom of the boat on either side of the center line dont want it in front of your prop use the brass scoop nut on the inside and sealing it with 5200 on the outside some of the scoops have 3 holes for screws and if you want you can use them as well then attach a on off valve a 90 degree elbo and then your live bait pump. There was a large glob of fiberglass putty in that location for me and the whole was where the old fitting was I just removed the old and replaced with new brass fittings. Now for the transducer thats another story. First off my ducer for my finder was shaped kind a like a football so I cut In The Center Line of the Boat a hole to allow the ducer to drop right through. Then I laminated fiberglass blocks together with the same size hole in all of them that making the outside wall approx ½ to ¾ thick of glass blocks the last block which was approx 3/8 thick I made with the smaller hole in it to accommodate just the pipe fitting of the ducer so I could screw the nut to it to hold the ducer onto this all glass fabricated ducer holder. Then I added a layer of glass over the top just to make sure it was totally shock resistant. Then I epoxy that to the inside of the boat and then add two more layer of clough over it to make sure it becomes a part of the boat. Then I just ran the ducer cord up through the hole and 4200 the ducer in side the ducer box and screwed the nut in place. The bottom of the ducer is at the same level as the bottom of the boat. No cavitations, no bubbles just part of the bottom of the boat. I get excellent readings running 30 + mpr it is definitely the way to mount a ducer on a boat. There was a guy from the Mako sight that made a reverse mold out of glass and did it that way I thought that was a excellent way to go and if I ever needed to do another I would make a reverse mold and do the same thing. FellowShip _______________________________________________ My motto: Just for the Grins 
|
|
#3
12-18-2006, 07:56 PM
|
|||
|
|||
|
What X-ducer are you going to use?
I install the saltwater pickup's on the Port side and X-ducer's on Stb. side. Scroll on down. http://www.classicmako.com/forum/top...06&whichpage=1
|
|
#4
12-18-2006, 11:21 PM
|
|||
|
|||
|
WartHog....very nice!!! I have the same B-60 Airmar(w/Furuno 585) and the same 2-bolt pick-up. It was originally mounted on the starboard side. Airmar reccomends starboard side mount so I may be swapping them. I have the same basic plan but.....Did you only epoxy the blocks down?? Or glass on top of them?? What white paint did you use?? I may 4200 the bottom of blocks....Did you consider doing that???? Thanks for the help!!
|
|
#5
12-19-2006, 05:24 PM
|
|||
|
|||
|
The block was covered with glass before I installed it. The Seacock is a 3hole model.
The inside of the bilge was preped with a grinder. Then the block was glued in with epoxy/Cabisol. You can cover it with glass if you want. It's hard to work thru a 8in piehole. On your block, something I didn't see. I overbore the Seacock mounting holes and back fill them with Epoxy/Cabisol and then redrill the pilotholes. The seacock is bolted down with lag bolt's. This will stop any water that may seep around the thread's from getting to the wood. The paint is SW Tile Clad HS epoxy paint. This block is from a different boat. The wood on this one is Cypress. You will see a H & arrow on the block. The H stand's for handle. The arrow is for front. It's VERY important that you mock all this stuff up dry. Make sure the handle is located where you can get to it easy and it will not hit anything. Remember you must be able to turn the seacock onto the thread's of the scoop. I had a close one on that install of the block in the pix. It's hard to see everything thru a 8in piehole. I couldn't spin the seacock. The handle hit the in deck livewell. The fix was remove the handle for the install. Then reinstall the handle. Once the whole thing is mocked up, use a Sharpie marker to mark the outline of the block. This will be where to keep the glue. The block is marked with the H & arrow so when everything is taken apart, you can put it back just like it was when it was mocked up. Some foward thinking goes a long way to cure trouble ahead.  
|
 |
| Thread Tools | Search this Thread |
| Display Modes | |
|
|


 Linear Mode

