
|
|
|
|
#1
 03-07-2005, 11:28 AM
|
|||
|
|||
|
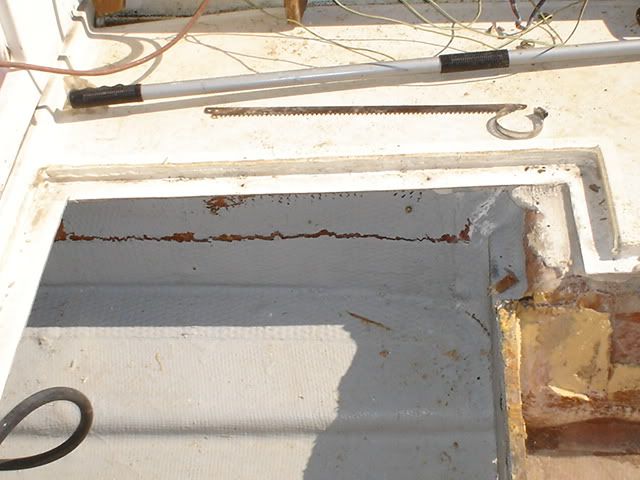
Pulled the merc sunday afternoon found the transom rotted as well, sent finster some picks this morning i might try to lift the whole liner up its already loose from the hull,ordered a new 136 gallon tank from rd tanks, they built the original,They beat everybody by 3 to 4 hundred dollars. Has anybody run a 225 or 250 4 stroke without a bracket?

|
|
#2
03-07-2005, 12:46 PM
|
|||
|
|||
|
From the pic's it all looks pretty standard issue.
__________________
http://lecharters.com '76 23 SC CC I/O '86 20 Aquasport 200 '98 15 Boaton Whaler Dauntless There's more but w/e
|
|
#3
03-07-2005, 02:44 PM
|
|||
|
|||
|
Looks like a typical SC project. I want to see more pics of the Tri five.
__________________
May all your deadrise be variable. My 1973 SeaCraft 20SF Parker 2530 DVEC Boston Whaler 15 1984
|
|
#4
03-07-2005, 02:46 PM
|
|||
|
|||
|
If it were my boat I thing I would postpone the stringer decision for now, I think I would drill some holes in them to see what comes out First lets say every 2 or so close the bottom of the stringers in all the concerning arrears leave open, dry and move on. Then I would do the transom as my first real project. I would raise the transom to 30 and buy your motor accordingly, by the way 225 or 250 is a great choice on the transom for your boat. Then after the transom done go back to the stringers and make your decision. From your pictures it looks to me that they could be repaired not replaced if they are dry in there. You could grind out the cracks and add 2 or more layers of glass and tie them back to the deck. Then after that make your deck for the gas tank and install it after that check out the boat deck if ok put the tank in and in just a little time after that your project will starts looking like a boat again. When my boat was in the ugly duckling stage I had a guy chasing me down for over a mile by car trying to ask me if I was taking the heap of cr*p to the dump and if I was could he have it.
FellowShip [img]/images/graemlins/cool.gif[/img]
|
|
#5
03-07-2005, 04:06 PM
|
|||
|
|||
|
Just like fellowship said . . . Those stringers are tabbed to the hull . . . they are pre formed outside the hull and then glued (tabbed) in place with fiberglass tape (18oz roving and 1/2oz cloth). Those bonds should never come apart . . they didn't do the prep work (i.e. sand clean with acetone). This is why tracker gets a bad reputation.
Anyhoo . . to fix: Get a cutting wheel or a thin disc for a 4inch grinder and run it along the base of the cracked tabbing on the stringers. Remove the old tabbing. Dry out the stringer (maybe some 2 inch holes evenly spaced). When the area is dry prep the hull and the bottom 4 inches of the stringer . . . clean the area with acetone. Buy 25yards of 6" wide 1708 or 1808 fiberglass tape and a gallon of epoxy. www.uscomposites.com Tab the stringers back in place ( if 6" isn't wide enough you can "widen repair) by overlapping of the layers . . . make sure that the overlap covers the seem i.e. where the stringer and hull meet). 3 or 4 layers of 1808 should be enough.
|
|
#6
03-09-2005, 01:10 PM
|
|||
|
|||
|
Hi Salvagefirst
I have a '85 23' in what appears to be the same layout and went through some of the work you have in front of you, over the past year. For the stringers, I found a number of voids where the foam must have been poured too quickly. I found you could actually sound them out with a rubber hammer. Drill access holes above these points near the top of the stringer, at least 1" in diameter. I would also drill drain holes along the entire bottom edge of the wet stringer. I used a couple portable fans aimed at the top holes and eventually over a few weeks, dried up the foam. Then patch the lower holes as Big Shrimpin described and pour new foam (SLOWLY) into all of the access holes on top. I actually used a complete one quart kit on my stringers, that were supposed to be filled at the factory. Once cured, patch the top holes and you onto the Fuel deck . There are many threads on the site on fuel deck replacement. I found that bedding a 3/4" epoxy coated piece of marine ply, into a strip of fiberglass putty, along both edges worked for me. The putty is available in a gallon size from Mertons supply, and has many other uses in the repair process as well. I covered the top and tabbed up the sides about 6 incles, with a 6oz mat and a layer or two of 1808 biax cloth. Hopefully bulletproof hereafter. I built a rear edge onto the deck, as well. Regarding attaching your tank to the deck, I also used 1/4" strips w/ 5200 to attach but I didn't foam the tank back in. Instead, I layed a small strip ( 1/2 x 1") of foamcore between the tank and the stringer on both sides. These strips take up any of the spacing in which the tank could move side to side. Between the 5200 strips on the bottom, the rear edge and these foam strips I do not believe the tank is going anywhere. I bought the tank from SP tanks in NJ, which I believe may be close to you. They offer for a small additional price to exopy coat the tank, which I would recommned. One word of caution. Make your final tank measurements (especially the height measurement) after the tank deck is glassed in. remember you'll be adding 1/4 " strips under the tank and a layer or two of glass to the top deck, so take that into consideration. Good luck and keep the pictures coming. Dink
|
 |
| Thread Tools | Search this Thread |
| Display Modes | |
|
|


 Hybrid Mode
