
|
|
#11
 12-14-2014, 10:42 PM
|
|||
|
|||
|
Quote:
Only difference is I slid it in flush(ish) with the inside of the fish box and let it hang long on the outside. When it was all kicked off I just sanded it flat, primed and painted. Also I drilled my hole pretty close to the size of the fiberglass tube, and sanded a small chamfer on the hull side of the hole. I filled the void between hull and fishbox with thickened resin, sanded and resined up the tube and slid it home. Troweled a little epoxy into the chamfer and then like I said earlier, sanded it all flat. Two seasons, no leaks or cracks.
__________________
Zachary [SIGPIC][/SIGPIC] 
|
|
#12
12-15-2014, 07:34 AM
|
|||
|
|||
|
Zac, explain to me what a chamfer is/does. Thanks
|
|
#13
12-15-2014, 08:38 AM
|
|||
|
|||
|
Just kind of sanded the outside of the hole (hull side) with a slight angle all the way around, instead of a squared off hole. Just a way to get more epoxy around the frp tube and bond it to more of the hull.
Same way you'd grind back a hull repair, but not so extreme. I replaced the forward fish box drain on my buddies 23 seacraft with an FRP tube as well, but in his instance I did grind back the hull just as if I was doing a hull repair, and laid glass over the opening after I epoxied in the FRP tube. Then re-drilled it from the inside. He likes to pound the crap out of the boat, so I thought a little more hull integrity couldnt hurt.  You just painted your hull didn't you? Might have to take the simpler approach to avoid having to repaint a section.
__________________
Zachary [SIGPIC][/SIGPIC]
|
|
#14
12-17-2014, 02:01 PM
|
|||
|
|||
|
Ok, so I went with the simplest attack and decided to just put a new brass drain tube back in. I drilled the hole with a one inch hole saw and this is what I find...
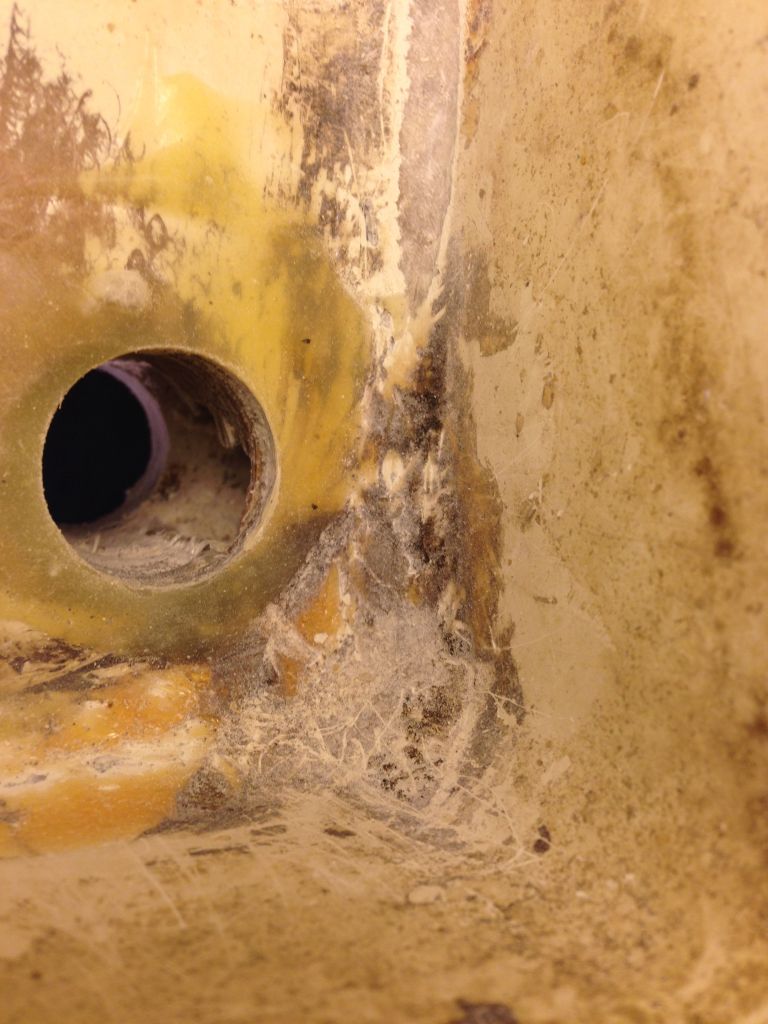  If you can't tell from the pictures there is a large void on the aft side of the hole between the hull and liner, I can stick my finger as far back as I can reach. What the hell do I do now?
|
|
#15
12-17-2014, 02:16 PM
|
|||
|
|||
|
Get some 1" dowel rod. You will need a couple of pieces about 6" long and one just the thickness of your hull - attach that piece to the center of a small piece of plywood. Cover it in saran wrap and plug the hole from the outside - brace it in place. Mix up some cabosil with some glass fiber in it - you will need a couple of batches big enough to fill the void. Cover the other dowel pieces with saran wrap - you will use these as 'plungers' like in a syringe. Fill the hole with cabosil and work as much as possible into the void. Refill the hole with cabosil then push the plunger in to force the cabosil into the void. Leave it in to set then the resin will release from the saran to let you pull it out. You may have to bore it out and repeat it to get a good fill.
|
|
#17
12-17-2014, 02:24 PM
|
|||
|
|||
|
Before I do that, do you think it would be a good idea to put some cabosil in the void by using my finger so it has something to stick too and so I don't just keep pushing all that stuff aft when it gets into that void via the plungers?
|
|
#18
12-17-2014, 02:26 PM
|
|||
|
|||
|
I heavy some west system thickened epoxy already in the tubes that says to just mix 1:1. I forget the number of the system but do you think that would work. It's sags very little if at all
|
|
#20
12-17-2014, 02:29 PM
|
|||
|
|||
|
Quote:
|
 |
| Thread Tools | Search this Thread |
| Display Modes | |
|
|


 Linear Mode

