
|
|
|
|
#1
 10-10-2011, 01:50 PM
|
|||
|
|||
|
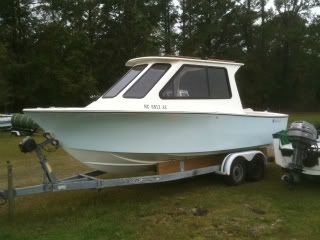
Windows are installed. Other rigging is in progress.

|
|
#3
10-10-2011, 02:13 PM
|
|||
|
|||
|
Nice visibility
__________________
Thank goodness that in the scheme of things you are broke, powerlesss and inconsequential, because with the shortsighted alternatives and idealogy you have you'd be much worse than those you complain about.
|
|
#4
10-10-2011, 03:18 PM
|
|||
|
|||
|
The cabin has 6' 5" head clearance in the middle and is an inch thick. At 6' 3", I've had enough head bumping and stooping!
|
|
#5
10-11-2011, 12:25 AM
|
|||
|
|||
|
Your boat is super slick. I like the way your top slopes back. You obviously have put a lot of thought into it. When you are finished if you dont mind I would like to see exactly how much visibility you have from the helm and how the top is bolted to the top cap of the boat.
strick
|
|
#6
10-11-2011, 09:28 AM
|
|||
|
|||
|
That thing is hot!!!!
Very nice.
__________________
May all your deadrise be variable. My 1973 SeaCraft 20SF Parker 2530 DVEC Boston Whaler 15 1984
|
|
#7
10-11-2011, 01:03 PM
|
|||
|
|||
|
Strick, I'd be glad to show you the connection of the top to the top cap, and the cabin view, as soon as I do another photo session. Thank you so much for the complements. Your projects have been a inspiration and an incredible education.
|
|
#8
10-11-2011, 11:45 PM
|
|||
|
|||
|
Thanks! I'm partners with a buddy on a 1973 Tsunami and in the past we have talked about doing a full fiberglass enclosure. That or a radar arch and removable full canvas. Yours is very nice and it's tempting to copy it.... EXACTLY!
strick
|
|
#9
10-17-2011, 01:26 PM
|
|||
|
|||
|
Here are images of where the cabin joins the top plate. The cabin fits right into the flat previously occupied by the aluminum windshield frame, so the new cabin/top is truly a direct replacement.
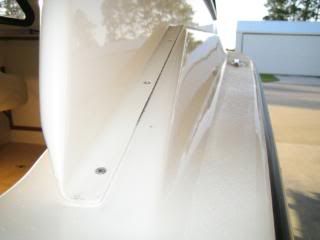 The cabin was positioned to maintain a constant distance from the edge of the top plate on the exterior and this left a small interior gap of varying width. A 1/2" varnished teak quarter round molding will cover the gap. (The dangling wires will be secured when the engine wiring harness is installed.) 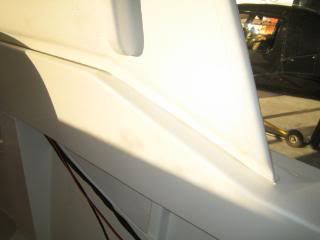 Here is the view more towards the bow. To soften the lines and to add a horizontal component, a varnished teak band is going to to cover this junction. I really like a touch of wood and am willing to pay the maintenance price. The teak will be installed for easy removal later. I'm at varnish coat number 5 and still going. Someone in one of the other threads said "There is no scrap teak." How true!!! 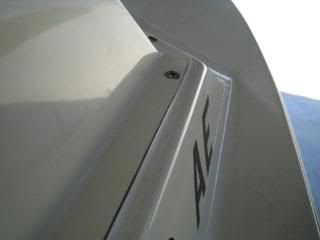 The engine wiring harness was short by 2 feet, so a new one had to be ordered, pushing the splash date back a week. That gave me an excuse to do some things that weren't essential for launch, but needed doing anyway. I installed the QL trim tabs (more on that later), placed headliner and teak trim in the forward cabin, installed the magic box (Garmin 740 that does it all), and finished wiring the electrical system. It's always a rush, and a little scary, the first time one powers up the elecrical system. Thankfully, there were no fireworks.
|
|
#10
10-18-2011, 10:02 AM
|
|||
|
|||
|
Thanks for that. How will you be accessing the bow? is there a flush mount hatch that is not visible in the pictures? Page 2 had something that looked like one. Did you replace the headliner in the cabin your self? Tips on that would be nice as I still have to do that in my 25. How was the inside of the enclosure finished? sanded ? or something else?
Thanks for the documentation...really appreciate it but size your pics to 640x480 and they will be easier to see. strick
|
 |
|
|


 Hybrid Mode
