 |
|
#31
|
|||
|
|||
|
Looking good Bill. Keep those pics coming along.
Strick
__________________
"I always wanted to piss in the Rhine" (General George Patton upon entering Germany) |
|
#32
|
|||
|
|||
|
Great looking project! The easy part is over. Now the fairing and sanding come. Get yourself a good mask and goggle combination along with something to cover your body. IE old clothes or a body suit. A beer never tastes better than after a few hours of sanding in 90 degree heat.
__________________
Capt. Brian |
|
#33
|
|||
|
|||
|
Congratulations on finishing up your transom.
I am not trying to rain on your parade....However, I think I would it is very important to point out to others who may lack boat building or boat repair knowledge that this IS NOT the way most professionals rebuild transoms. The most accepted way amongst the boat building community is to remove the rear section of the liner, remove rotten core material, recore transom in one solid piece from the inside, and then reglass in the liner back in place. Cosmetically, it is the most invasive method. Structurally it is the best method and of course, as with most things done right...it is the most time consuming method. |
|
#34
|
|||
|
|||
|
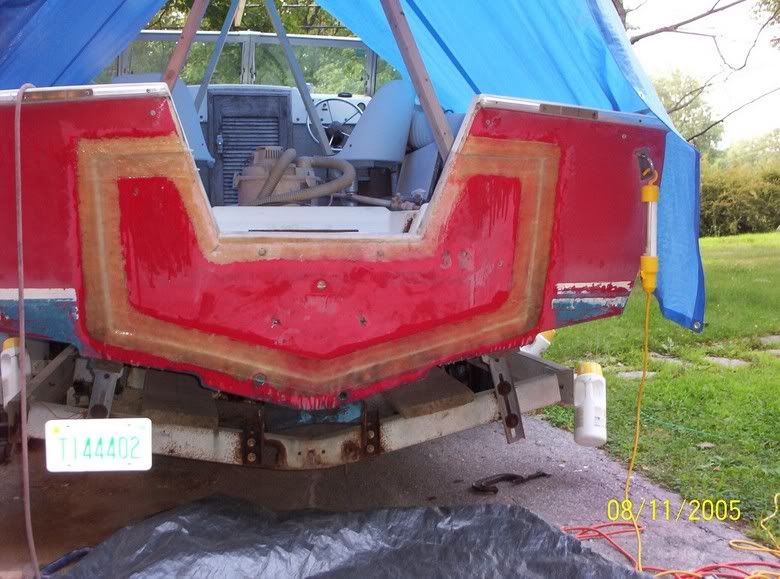
I wish it was finished - but at least it's getting closer.
I taped the seam last night, and finally got around to tabbing the knee and the keel hole repair. Off to see my girlfriend next, and get to the filling and fairing this weekend. Ed - I hear where you're coming from, But.... "most pro's" ... ahem, excuse me while I clear my throat see that hole in the keel stringer? the one where the drill slid off to the side, and didn't go straight thru the keel, but down the side, cutting all the way down thru the RW keel wrap. Done by a "Pro" boat yard. I've read thru every string on this and other boards, rotdoctor, etc Go back to currently page 91 of this site, poster Rich started a similar project, see thread "Wet transom Too" poster "Whitehawk" comes in and says the same thing you just did, then poster "Hermco" whom I believe is also a pro, come along and disagrees, that the external repair is also correct. Sounds like this is an endless debate. I'm an engineer, and I make up my own mind, based on what I see. I am not impressed with the transom design as found in this boat, in terms of structural support. It relied heavily on the integrity of the core, with inadequate supporting structure, provided, not with knees, or multiple stringers at full height coming right up to the transom, as seen in the mako's, but strictly thru the cap assembly. These boats have real nice stringers in the hull bottom, but, at least in mine, they reduce in height significantly before joining the transom, reducing their support value. The outer skin was 1/8" matt, rather suprisingly thin, with a thick layer of putty, heavily troweled and grooved, between that and the plywood core, while the inner transom was a combination of matt and RW - more meat in that. Wet plywood has the structural integrity of cardboard. If the core gets wet, it's all up to the glass, and the design... and then "pro" boat yards that drill holes thru the transom for bolts to mount things, and don't put any bedding in. Ehh, what's the use, it's an endless debate, with as many variables as there are boat designs, and boat yards doing setups and repairs. each one is a seperate case, in my eyes. We'll have to hoist a beer together sometime - getting them in the water, and having fun, safely, is what it's all about. Bill |
|
#35
|
|||
|
|||
|
Sorry Ed, I agree with Oldbluesplayer. The improvements are substansual. I once rebuilt a couple of ribs in an old ketch that was made in Formosa. Every body said that by not replaceing the rib and only forming a new one in it's place while still afloat that I was making the boat weak.
About a year and a half latter a drunck ramed the boat about three feet away from the repaires. The two ribs I made were the only undamaged in the cockpit area on both sides.Some of the stips lamenated were end to end and were gusseted to the keel. The same here, O's repaire is a stronger then original improvement. I beleave that a future rot problem is also less likely. The stringers are not likely to go any faster then the outside of the hull and the motor pressure is now in a better method of transfer. The transom will take less strain.
__________________
www.bigmikeslures.com |
|
#36
|
|||
|
|||
|
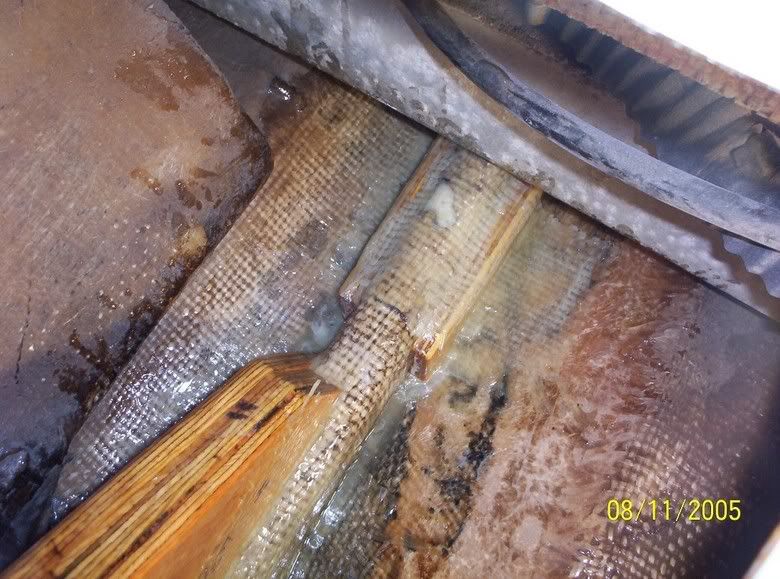
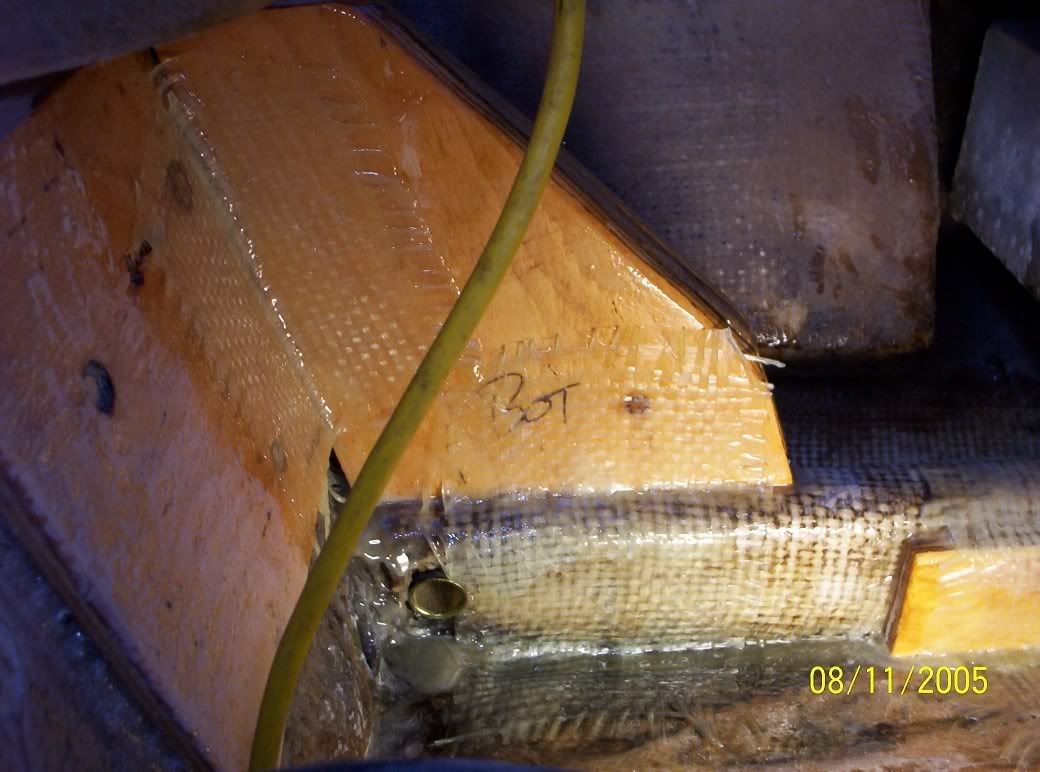
after bonding the outer skin, I have cleaned that up, sanded down the squeeze out, and done some seam taping
 also went back inside and finished up the transducer / hole in the keel repair, and tabbed in the knee here is the foot of the knee, showing how it is 3 layers of ply thick, and bonded to both the side, and the top, of the keel - also the finished transducer hole patch.  and a decent overall view of the tabbed in knee  next up - on to fairing out the transom, also need to add in a new mounting plate for the bilge pump and float switch - the original plate was screwed at all 4 corners directly down into the fiberglass of the hull, only one screw was still remaining - new one will be bonded. Bill |
|
#37
|
|||
|
|||
|
Bill, This is ment to be helpful for next time. [img]/images/graemlins/smile.gif[/img]
Before installing those piece's, they should have been run thru the tablesaw and the edges cut at a 45deg angle. This will make your fiberglass conform to the surface that they are attached to with a smooth transition. You can get the same effect if you will run fillet's around the permiter, but it's more work. It's the only option you have now that they are installed like they are. On the top exposed edge of the knee itself [where the 3 layer's are] The outside edge's should have a router run around it with a round over bit. This will make the glass conform better around it exposed corner's. The next thing is to use lighter weight glass. That heavy Roven Woven doesn't like to conform around a tight radius. I'd suggest multiple layer's of 9oz or 12oz to conform around the outside knee radius and biaxle +45/-45 to cover the rest. It will conform around the inside corner's well, if you put some fillet's in there. 
|
|
#38
|
|||
|
|||
|
I find myself sometimes getting lost in all the little details..
at least twice I've had the resin in the pot, just about to start adding hardener, and realized I had yet another get-ready task to do first, before I pulled on the gloves and started the clock on a batch. It's certainly a learning experience, getting up close and personal, so to speak for the next time - I'm hoping there isn't one. After moving up thru 5 boats over the years, this one is intended to be the return to a trailerable, manageable, can upgrade the power without tearing the boat apart (hah) boat that can last me for awhile, and do the things I want to do (reason I got the cuddy, instead of a cc). and I suspect, by the time I get done fairing the outer transom, that I'll agree with Ed, that inside out is easier, but I'd still be adding the knee to this boat. But then, given that the boat is 32 years old, and probably only had an expected design life of 20 years or so, it doesn't owe anybody anything. Bill |
|
#39
|
|||
|
|||
|
Recoring from the inside is definetly NOT easier.
Remove deck cap, remove motor well, cut and grind until you drink soo much you need to join AA. My friend has a 76 23CC that was done professionally from the outside, the gelcoat match was redone prefectly and you can't see that the repair was done except that there is no alumunum trim because it was all faired in perfectly. He runs his boat very hard, and there is not a crack anywhere. I did mine from the inside because I wanted to get rid of the useless livewell and the extra weight. The boat now sits higher and when drifting the motor well does not fill up with water in a rough sea. http://i15.photobucket.com/albums/a3...epairs5_14.jpg I'm glad to hear another engineer thoughts. Keep up the good work. Paint the bilge with white gelcoat when done and everyone who knows boats will be impressed.
__________________
73 23 SF 2004 200 HP Yami OX66 Best boat I owned! 2002 29 Seavee twin 200 yami's |
|
#40
|
|||
|
|||
|
stoney Look's like you used Cossa or Penski board?
 Shurwin William's Tile Clad HS epoxy paint make's an outstanding bildge paint. It was designed to paint the inside of water tower's, so it will hold up and look good doing it. I used it in my bildge and all thru the inside of the cuddy and console's. |
 |
|
|