
|
|
#11
 09-07-2004, 08:42 PM
|
|||
|
|||
|
QUOTE: Do you think it would be ok to layup the two layers of mat and then secure the core with the glue and screw (thru bolt) method. Let that cure and then finish the rest of your layup schedule all in one shot. Thanks -Will
That's what I would do to make sure that the core is beded well and no voids. 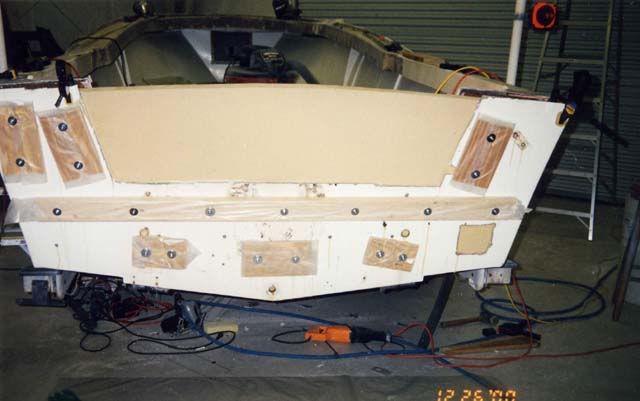 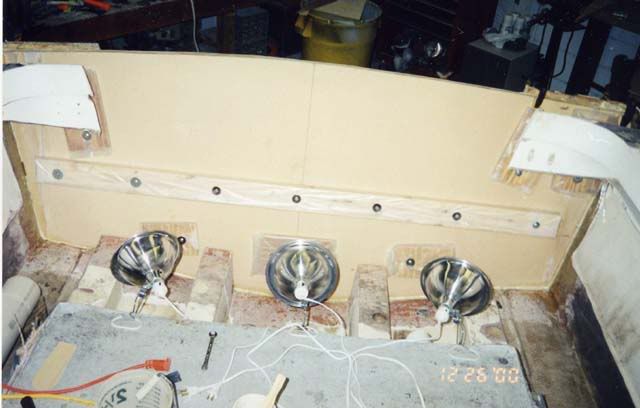

|
|
#12
09-07-2004, 09:09 PM
|
|||
|
|||
|
warthog5,
Thanks for the info. Do you think I should layup the mat on existing transom skin and let that cure before bonding the core or just lay both the core and the mat at the same time. P.S I've been following your progress over on the mako site and check for updates almost daily. Very nice work!
|
|
#13
09-07-2004, 09:12 PM
|
|||
|
|||
|
Will,
I used a grinder to remove some of the wood in that area. Do a dry fit before glassing in everything. You can also grind the splash well a bit thinner. You'll want to make up a putty mix and trowel it on the core and then clamp it into place. It's two steps, glue the core in place and then come back later and laminate the the core. I used chopped mat on both the skin and the core, but you will need the putty also. I'm using Ployester and currently waiting for cooler temps. 
|
|
#14
09-08-2004, 10:34 AM
|
|||
|
|||
|
Gents-
The problem with doing an outside transom job versus an inside transom job is that an outside transom job is more structurally invasive and MAY affect the geometry of the hull. However, inside transom jobs are more work and sometimes require working in confined areas. Definitely lay up one (or two- depends on how much room you have to work with and what the shape is of the inner transom) layers of mat first against the inside of the transom and temporarily bolt, screw, etc. it in place. I also like to make fillets around the entire perimeter of teh core material. It helps adhere the core edges to the hull, keeps water out and also gives you a rounded surface to roll out the glass on versus a hard edge if you did not use them. Fillet materials can be made out of any type of resin, by adding cabosil, Q-cell or microballons. As far as layup schedule is concerned, that was just my recommendation based on the transoms that I did when I used to work at a restoration facility. Yes, that's a lot of glass on the inside (bilge side) of the core, but with today's motors weighing what they do, why take the chance and skimp on materials? The important thing is to make sure that each layer has enough resin (but not too much resin)on it and is rolled out tightly to promote good adhesion and eliminate any air bubble. Also, if you are using biaxial in between layers of mat, it is a good idea to use alternating layers of different orientation (45 degrees, 90 degrees, etc). As far as what resin to use (polyester, epoxy, vinylester) there are pro's and con's to each. It all depends on the project at hand and what your budget is. The important thing to remember is that each job is different and to take your time and do things right. As EBEACH said, DEFINITELY dry fit everything (glass, core material) before you start rolling on resin. Hopefully this helps. Ed
__________________
http://www.thenavigatorclub.com http://thenavigatorclub.blogspot.com/ http://i18.photobucket.com/albums/b1...d_rgb_72-2.jpg
|
|
#15
09-08-2004, 12:12 PM
|
|||
|
|||
|
Ed,
Im not so sure which way (inside or out) is the better way of replacing the transom on a SeaCraft. Ive never worked on another brand of boat and Im only working on my second, but I just dont get why SeaCraft used only chopped mat on the outside of the transom, and such a thin layer????? Could someone ask Bill Potter this question? Jim
|
|
#16
09-08-2004, 02:56 PM
|
|||
|
|||
|
Hey Jim-
I was taught that the inside method was the best way to replace a transom...so I just stick with what I was taught and what I have personally done. Not sure why Seacraft used just mat on the outer skin of teh transom. According to the laminating schedule on this site, they used alternating layers of mat and woven roven in the hull...so one would think that the transom would be made of a similar schedule. -Ed-
__________________
http://www.thenavigatorclub.com http://thenavigatorclub.blogspot.com/ http://i18.photobucket.com/albums/b1...d_rgb_72-2.jpg
|
|
#17
09-08-2004, 03:39 PM
|
|||
|
|||
|
Will There is a lot of good imfo here. As said always do a dry fit to check everything first. To add to what Ed said about the fillets. I couldn't agree more. I added fillets before the core went in. The inside corners of my boat were exact 90 deg angles and I didn't like that.In both pix's below you will see I added fillets and 1808 45/45 over them.
I then rounded the Kledgecell core to fit. Now I didn't follow the instructions from above. You have to remember that ALL my work is done with FGCI's 2 to1 epoxy and epoxy is a very good glue, compaired to polyester resign. The inside of my transom was very flat. I made sure of that. I coated the inside with epoxy [very heavy] I then coated the core with epoxy [very heavy] Then I mixed more epoxy and added Cabisol to it and used a notched trowl to apply it all over the transom core on it's backside. Extra epoxy/cabisol was laid in the corners. Then everything was bolted together. There is 3 layers on the foward part of the transom core. 1808 45/45, 2415 0/90, 1808 45/45. On the outside of the transom I ground all the gellcoat off and added 2 layers of 1808 45/45. I don't like using mat with epoxy. I think it's a waste of good epoxy. With that said the 1808 has 3/4oz mat stiched to it and helps as a bedding. Bedding is what mat is really for. To take up any voids or iregularities [sp?] this is real important with polyester and the use of roven wovens. I don't use a lot of roven woven. The biaxles are a much better product and it cost's about $1.00 to $1.50 more a yard. Money well spent if you ask me.  
|
|
#18
09-08-2004, 07:13 PM
|
|||
|
|||
|
The Industry standard for fiberglass thickness on the transom of these old boats used to be 3/8 inch thick on the outside. You cant go wrong if you go 3/8 on the inside as well. Reinforce the corners. I agree with Bobby on substituting the 1808 biaxial for the woven roving. It will be easier to work with. The matt in 1808 is loosley stitched to the biaxial cloth to allow better penetration of epoxy as compared to 1708 were the matt is chemically bonded to the biaxial. I've used epoxy with both but the 1808 is the way to go. Also use the Raka 2/1 epoxy. Good luck
Strick
__________________
"I always wanted to piss in the Rhine" (General George Patton upon entering Germany)
|
 |
|
|


 Linear Mode

