
|
|
#1
 05-31-2006, 11:48 AM
|
|||
|
|||
|
OK
. Here goes
.
Been thinking too long on this, but what if; - Replaced my plastic thru hull scuppers and replaced them with a bronze extra long thru hull fitting - Then screw on a quick disconnect brass hose fittings that have a brass check valve plug built in, could it be the new improved off the shelf Vorteq!!?? - Put a brass cap on the male end on the quick disconnect fitting when needed to plug the scupper - Have a livewell pump assembly ready to snap in and out when using the on deck livewell and other hose quick disconnects to the livewell to make it easy and clean setup. - Have a washdown pump ready with male quick connect ready to use also Maybe?? Few noted issues so far; - The original plastic scuppers (assume they are orig?) were set up for 2 pieces so they could allow for the angle. Bronze 1" long thru hull fits nicely, but would need some fairing on the hull bottom to blend in the angle. Bronze 3/4" actually fits flush because the larger hole allows for angle tilt, but obviously would need to fill in the diff. 3/4" is actually nice because the brass quick disconnect threads(although brass fitting is hose thread) on and seals nice with the inside rubber gasket. I would need to cut the Bronze fittings to length at ~ a few threads above the locking nut. - Livewell pump might not work above the water line. I used min fittings to keep the pump close to the water line as possible. It might work, although Rule states they should not. Shurflow Bait Sentry claims it will work a few inches above the water line, I may try that pump. If not, the dual purpose washdown/livewell pumps will work but I would like to keep them separate if I can. - Underway there will not be any water under the scuppers to draw from. I am OK with that, I plan on pluming the livewell to just recycle when running and draw when at rest. Washdown at rest it fine also. I realize to drill a new thru hull down in the bilge is not a big deal, but access is tough in my bilge area and why not try to improve the existing scuppers and use them as a thru hull source? Here is a couple of pics .. Now take it easy on me . I have feelings  - Nick - Nick    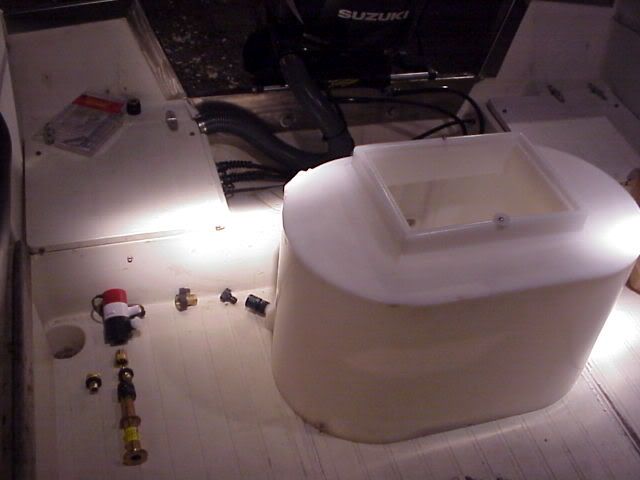

|
|
#2
05-31-2006, 03:34 PM
|
|||
|
|||
|
Thats sounding like building a better Mouse Trap. But mine only cost $1.00 plus beer.
My concern would be the purpose for the scupper is to drain water out of the boat fast. This multi purpose through hull fitting is going to trap water inside the boat. In a emergency you need water to go out fast and you might not be available to turn things around quickly with your multi purpose fitting. I will not plug my scuppers up with a plug for this very reason I just wanted the water to go out not in. I would go the traditional way with a scoop on the bottom of the hull with shut off valve and then live well pump and wash down pump attached to it. FellowShip _______________________________________________ My motto: Just for the Grins
|
|
#3
06-02-2006, 12:21 PM
|
|||
|
|||
|
hmmmm.. where is the raft mounted again.. I agree that the scuppers are for letting water out not doubling as a pick up for the live well. Added weight and then taking one over the stern , then trying to undo everything to make it a scupper again...
__________________
Don Battin Pipe Dreams Marine "Design her right, Builder well Bend the throttles, And leter eat ." Carl Moesly
|
|
#4
06-02-2006, 02:55 PM
|
|||
|
|||
|
Thanks Guys and appreciate the feedback.
I struggle with this because most of the time I need to plug the scuppers due to weight anyhow. Not the best, but with this original scupper design also comes with common sense. I am planning to go with the cut to length 3/4" Bronze threaded thru hull to allow for the slight angle to fit flush to the hull and bought a Shur Flow Pro Baitmaster livewell/washdown pump that will be able to draw above the water line from ONE of these existing scuppers locations. Again, will use common sense when snapping into ONE of these scuppers in live well/washdown mode. For the amount of times I will may use a portable deck livewell, I cannot justify drilling out a traditional thru hull. I would use the washdown more at short intervals and would be low risk for the intake water to be snapped in/out of ONE of the existing scuppers locations. In an emergency the quick disconnect fitting can be unscrewed easily and removed and should only take a few milliseconds more to remove the standard plug. If an issue, I will go back to using standard plugs on these new Bronze thru hulls. Besides if I did not remove the existing plastic ones this year, I really would have been screwed if the plastic cracked!!!  Check these pics out 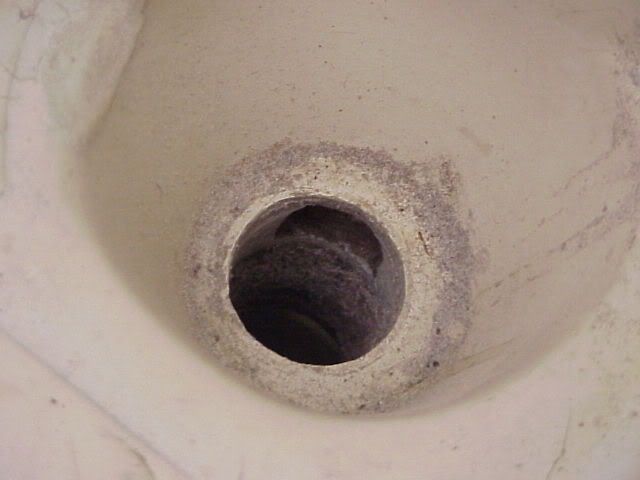 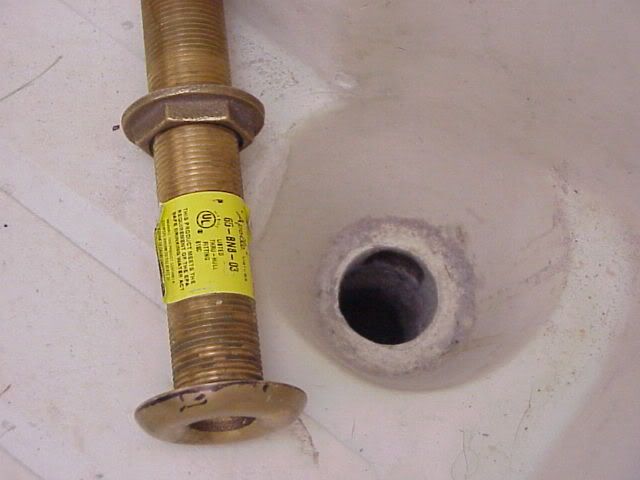
|
|
#5
06-03-2006, 09:35 AM
|
|||
|
|||
|
I'm guessing you have not mounted the livewell yet?
With a scupper drain problem, you are just increasing the problem with the added weight of the livewell being full. [8.2lbs per gal for saltwater] Move the livewell farther foward. I don't like the idea of using the scpper's as a pick up. It's a "tacky" install. [Is that easy enough on you?] HeHe Livewell pump's have been used as washdown pump's, but they are lousy. A livewell pump is designed to push. A washdown pump is designed to lift. [disphram pump] If you will look at all these pix's of my install, it work's VERY well and is safe, with the Seacock's installed where thruhull's are, unstead of ballvalve's.  No connecting and disconnecting of hose's and crap like that. There is to much going on, on a boat when fishing to have to worry about that stuff. You want to turn a switch on and it work's. Turn a switch off and it stop's. This is the bildge with the seacock's installed. 3/4in intake with bronze scoop and 1 1/2in drain out the transom.  Here is the dualport livewell pump. The top port goes to the livewell and the bottom port goes to the washdown pump.   Here is the washdown pump. It then flow's out to the washdown station [squiggy hose] There is a ON/OFF push/pull switch mounted under the washboard beside the washdown station to turn the washdown pump on. This eliminate's having to run foward to the console to turn the pump on. It right there at your fingertip's when you pull the hose out.   Plumbing installed. 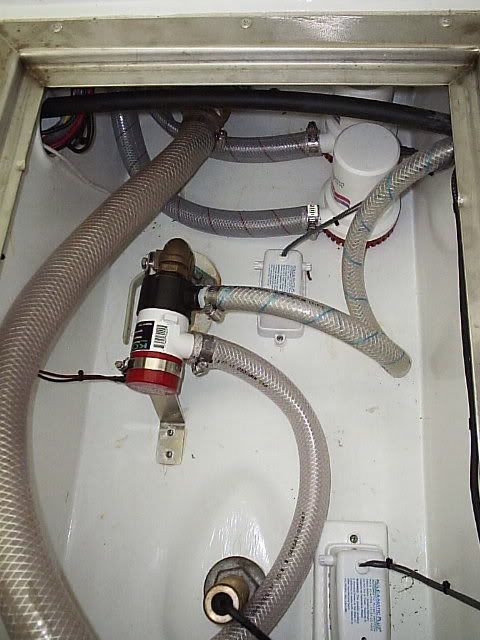 Livewell is a Kodiak 42-2. It has no exposed hose's on deck. It plumb's thru the bottom for a clean install. That hatch is nick named a NASA hatch and it is the cat's ass. No leak's to the bildge, easy access to the bildge, no working thru leaking piehole's.   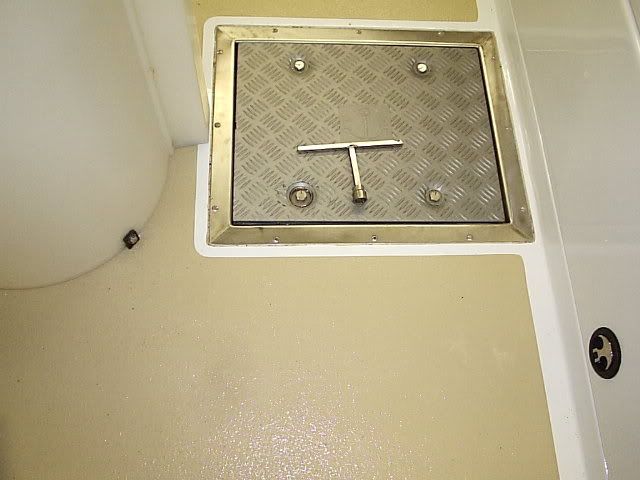 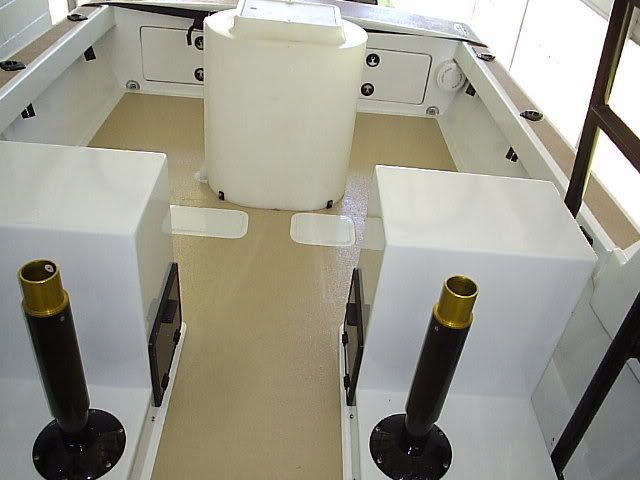 Sure it's more work to do a install like this, but look at the outcome. Clean and easy to use. No education required to train your fishing buddies as to what to hook to what. Less crap to worry about and safe. When the boat get's left in the water. Just close 2 seacock's that are easiely accesable thru the NASA hatch.
|
|
#6
06-05-2006, 10:46 AM
|
|||
|
|||
|
Very nice job.
Although I'm now a Mako owner ( formally had a seacraft 20 cc) You have given me some nice ideas to do on my mako. The prior owner had some kind of set up that I still did not understand how it worked so I did the easyest thing, I ripped it all out and am starting from new. The only thing the boss lady asked me was to find a place for some fresh water to wash down when coming out iof the water. I don't think that's a big request from her and it will provide some cool water on those hot fishing days Again Nice Job
|
|
#7
06-05-2006, 05:58 PM
|
|||
|
|||
|
With the water that comes in the scuppers with 2 people back there I thought about just putting a fitting on it and I could wash the whole boat LOL
__________________
Any way you measure it - dumbass is expensive
|
|
#8
06-27-2006, 05:05 PM
|
|||
|
|||
|
Okay,
After 2 weekend of tournaments, I have to conclude that these quick disconnect fittings work GREAT!!! It keeps the flow to a minimum on water entering the deck with livewell weight or lard-arse angler weight. During slow trolls, it draws and deck water(or this weekends rain water)out nicely 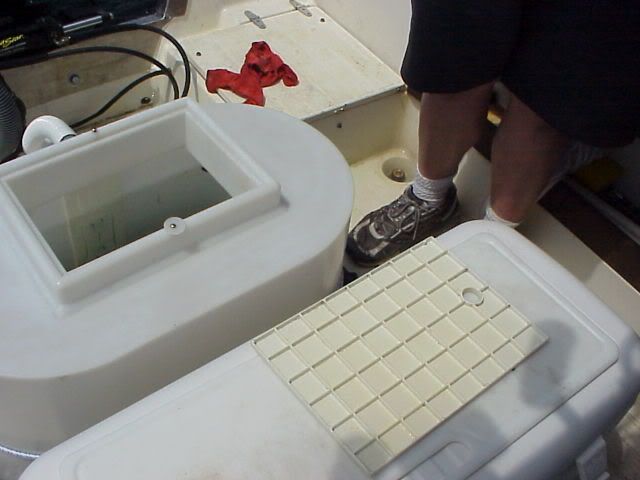 So here is the deal, - Pick up two 3/4" Bronze thru hulls, mark to length leaving 3 full threads above the nut for screwing on the quick disconnects. I used a double nut to lock on the length and cut slowly with sawzall following the nut. Used a dremel with a stone bit to taper in the end thread to look like the original threaded end. - Duck taped the threads and waxed the duck tape. Applied epoxy covered matt around the bronze thru hulls to make up the diff and cleaned, acetone, wetted out the original holes with epoxy. 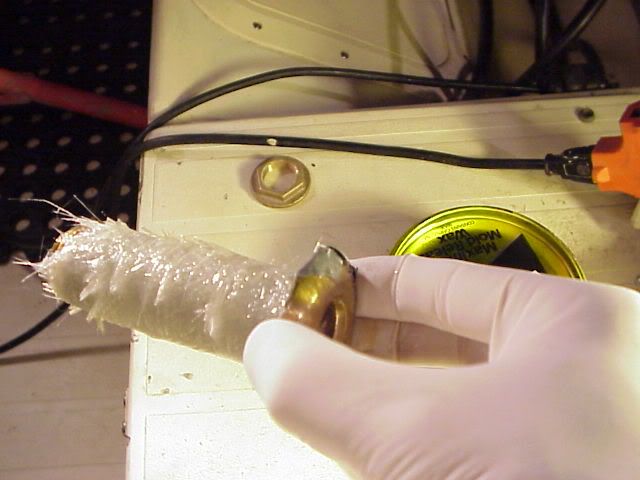 - Placed the new thru hulls up through the bottom and waxed the nut and cranked into place. Let cure for a a few days since I was not in a hurry and then take off the nut and unscrew the thruhull out the bottom. Clean/sand area around thru hull and thru hull fittings. - Decided to use quick cure 5200 (or 4200, too late now) the hole and thru hull and snug together. Let dry overnight, and then surprised that I could crank the top nut and into place the mushroom almost flush with hull making sure that the thru hull does not spin to break a seal. I trimmed off the excess 5200 that squeezed out around the thru hull mushroom head. I could put a nice bead around after, but I decided I made enough mess with 5200 so I left it alone.  - Screw on some Home Depot brass quick disconnect fitting with check valve(I noticed Lowe's has a similar one without the check valve) and you are ready to go. If you want them closed, put a brass hose cap on the other male end of the quick disconnect and snap in. Or use the brass cap and take off the quick disconnect and screw on directly. 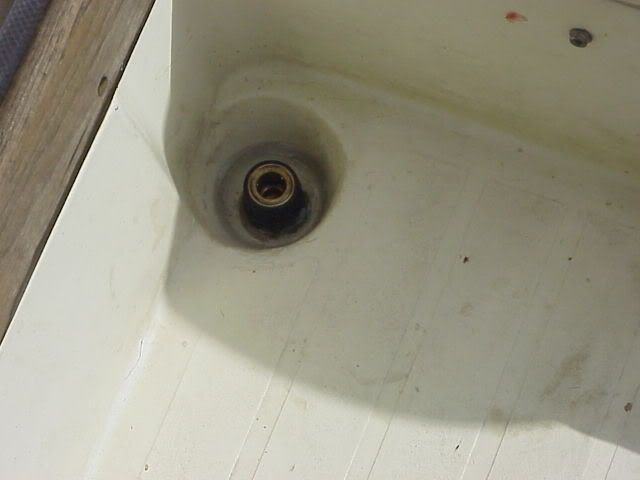  Now the livewell, - 1st live well pumps are designed to push water and to be below the water line. So I went with the washdown/livewell pump from shurflow designed to be mounted above the waterline and mounted under the star stern seat with strainer. 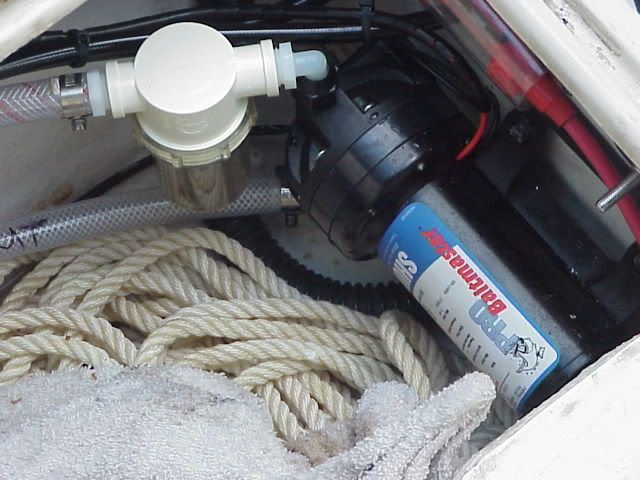 - I then decided on just leaving the hoses curled up under the gunnels rather than flush mounting female quick disconnect fittings. Not as clean, but my reason was that I did not want them to leak on the fittings where I could not see and I needed to test and may reroute in the future. Besides sometimes simple is better!  - Layed the livewell on a Home Depot rubber anti fatigue mat(I had to double up the back end with tie wraps to prevent the lower fittings from hitting the splashwell) and when full under weight it is not moving. I mounted a couple of eye bolts in the splashwell area to get some straps, but having the problem to find the correct length. I might go with some rope with spliced eyes with stainless snaps to strap around more to prevent it moving, mainly when empty. If it moves when full, it should be emptied asap!! 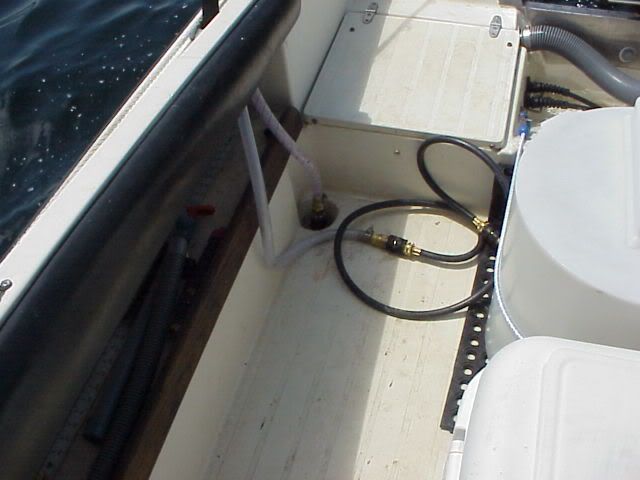 Now the washdown; - Picked up a 4' washing machine hose that has the 2 female hose ends. Add 2 male brass quick disconnect to each end and then adaptor to add the female to the nozzle end. Snap in to the outlet hose and start spraying.  - Remove the quick disconnect on the port side scupper to prevent clogging and max outflow and trim over or a lard arse buddy to tilt that side and it works like a charm. And if all of this sounds scary to anyone, I bought a Winslow 4-man offshore raft(only weights 40#!) with Pelican case and mounted in cradle on the hardtop!!  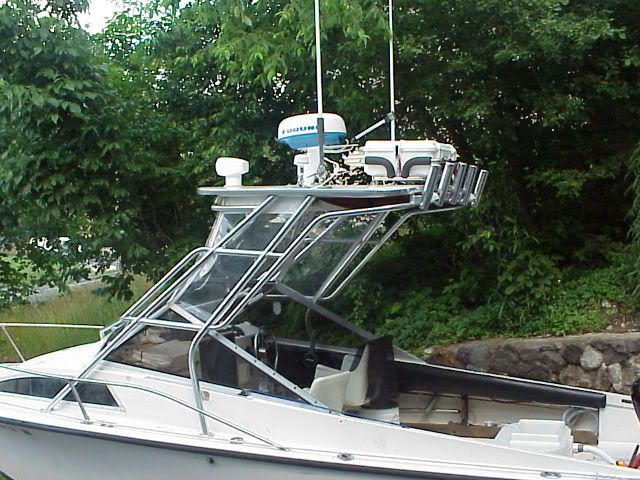 ( Many thanks again to Jim/Beth at BOE for the raft!!! .. They are the best!! ) See you in the canyons!! I will be the guy floating in the new raft!! - Nick
|
|
#9
06-28-2006, 12:20 PM
|
|||
|
|||
|
Nice install!!
I thought of doing the same thing but never tried. I fixed my original scuppers in a similiar fashion using a through hull like that which I turned on a lathe and a brass tube. It has been good for about 9 years. Thanks for the detailed pics. Good luck in the canyons. 
__________________
May all your deadrise be variable. My 1973 SeaCraft 20SF Parker 2530 DVEC Boston Whaler 15 1984
|
 |
|
|


 Linear Mode

