Classic SeaCraft Community  

Go Back   Classic SeaCraft Community > General Discussion > SeaCraft Photos
FAQ Community Calendar Today's Posts Search

Notices

Reply
 
Thread Tools Search this Thread Display Modes
  #31  
Old 12-02-2004, 04:41 PM
Capt Chuck's Avatar
Capt Chuck Capt Chuck is offline
gucci
 
Join Date: Aug 2003
Location: Sailfish Capital, fla
Posts: 2,804
Default Potter Bracket Update

Ok, I'm finally getting the transom transformation rolling. I had to wait for that darn CSC member named "Mark" to get his boat finished so I could start mine [img]/images/graemlins/grin.gif[/img]

Here's some updated photos. I thought my transom was pretty solid as there was no flex even thou it was bleeding a little at the cap, But as you can see, it was definately time for a makeover [img]/images/graemlins/frown.gif[/img] I feel that if it was not for the amount of glass in the engine splashwell and baitwell holding things together, the transom would have had to be replaced years ago [img]/images/graemlins/crazy.gif[/img]
I will be taking more pictures as I go

All hatches / Rocket Launcher, Trim tabs etc were taken off.


The Motor was then de-rigged and removed. Notice the water weeping out of the holes of the trim tabs and cap piece...


The Engine well, side buckets and the Transom were cut out. Look at all that black wet wood [img]/images/graemlins/shocked.gif[/img]


At least 30lbs of mush and wet stinky wood filled the trash can


Inside the Transom. You can see the where the wet wood was against the glass


Starboard Inside


Port Inside


This was the biggest piece of solid wood found but it was still very damp. Notice the hole dead in the middle behind where the engine mounted. I had filled it in around 1986 when I replaced the original 1979 200hp. Go back a few pictures and you can see the white Marine Tex held up and kept that section from water intrusion. Originaly this hole was the overflow drain for the molded in floor baitwell as this boat was rigged for twins from the factory [img]/images/graemlins/laugh.gif[/img]

__________________


1978 23' Superfish/Potter Bracket 250HP --------


as "Americans" you have the right to ......
"LIFE, LIBERTY and the PURSUIT of a Classic SeaCraft" -capt_chuck
Reply With Quote
  #32  
Old 12-02-2004, 04:44 PM
ScottM ScottM is offline
Dieter Sprockets
 
Join Date: May 2002
Location: Marshfield, MA
Posts: 2,221
Default Re: Potter Bracket Update

Chuck,
Glad to see things moving along. Looks like Riley is helping out too. [img]/images/graemlins/smile.gif[/img]
Reply With Quote
  #33  
Old 12-02-2004, 04:57 PM
Finster Finster is offline
Senior Member
 
Join Date: Nov 2002
Location: Little Egg Harbor, NJ
Posts: 1,855
Default Re: Potter Bracket Update

Chuck are closing the transom and cutting out the well? What did you do with the cap, cut the back quarters off?

I am still trying to figure out the best way to do the Vette's transom withougt too much cutting of things I want to keep. The SF was a piece of cake, room galoor.

__________________
http://lecharters.com

'76 23 SC CC I/O
'86 20 Aquasport 200
'98 15 Boaton Whaler Dauntless
There's more but w/e
Reply With Quote
  #34  
Old 12-02-2004, 05:10 PM
Capt Chuck's Avatar
Capt Chuck Capt Chuck is offline
gucci
 
Join Date: Aug 2003
Location: Sailfish Capital, fla
Posts: 2,804
Default Re: Potter Bracket Update

Chris, I hope this answers your question?

Quote:
What did you do with the cap, cut the back quarters off?
Removing the hause pipe, The cap was cut also, right thru the middle of the hause pipe hole. Go back and look at the second picture. You can see the two side buckets lying along side the console.

__________________


1978 23' Superfish/Potter Bracket 250HP --------


as "Americans" you have the right to ......
"LIFE, LIBERTY and the PURSUIT of a Classic SeaCraft" -capt_chuck
Reply With Quote
  #35  
Old 12-02-2004, 06:45 PM
Finster Finster is offline
Senior Member
 
Join Date: Nov 2002
Location: Little Egg Harbor, NJ
Posts: 1,855
Default Re: Potter Bracket Update

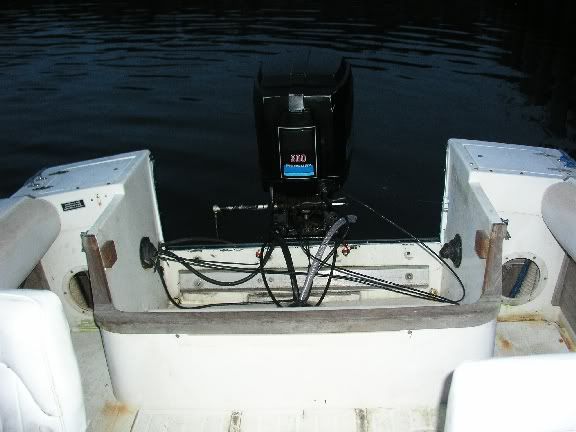
I got chuh. I need to do some figuring cause I need seating back there and I am not sure if I want to loose the well or go over top and leave storage. I really don't need the transom wells, so I may cut them out too.
__________________
http://lecharters.com

'76 23 SC CC I/O
'86 20 Aquasport 200
'98 15 Boaton Whaler Dauntless
There's more but w/e
Reply With Quote
  #36  
Old 12-02-2004, 09:33 PM
strick strick is offline
Senior Member
 
Join Date: Aug 2003
Location: California
Posts: 2,738
Default Re: Potter Bracket Update

Chuck-

Looking good there. Brings back not so distant memories. Looks like you are pretty far along. Keep the pic's coming

Strick
__________________
"I always wanted to piss in the Rhine" (General George Patton upon entering Germany)
Reply With Quote
  #37  
Old 12-02-2004, 10:27 PM
Mark Mark is offline
Senior Member
 
Join Date: May 2002
Location: 80304
Posts: 1,252
Default Re: Potter Bracket Update

Chuck,

As I have said more than once in the past - your boat is in the right place for the redo, you will be happy with the finished product [img]/images/graemlins/smile.gif[/img]
Reply With Quote
  #38  
Old 12-03-2004, 08:12 AM
Miles Offshore Miles Offshore is offline
Senior Member
 
Join Date: Feb 2002
Location: Virginia Beach, Virginia
Posts: 1,260
Default Re: Potter Bracket Update

I forgot you were down chuck- looks like you are moving right along though!!! One of these days Im going to have to stop fishing and do the total thing like you "true craftsman" on this board do. keep sending the pix!!!! [img]/images/graemlins/smile.gif[/img]

bte- love that 2nd "waterborne" shot in your first post!!!
__________________
"Lifes too short to own an ugly boat"
Reply With Quote
  #39  
Old 12-22-2004, 04:51 PM
Capt Chuck's Avatar
Capt Chuck Capt Chuck is offline
gucci
 
Join Date: Aug 2003
Location: Sailfish Capital, fla
Posts: 2,804
Default Re: Potter Bracket

Here's some more pictures of the work at hand as the transom transformation saga continues [img]/images/graemlins/shocked.gif[/img]

New fiberglass floor drains were constructed and glassed in. Also you will see a glassed in hose bib. The transom mounted rod holders and the two transom side boxes will drain into the floor self bails vs out the transom or side.


Notice how much bigger in diameter and higher the self bails will be than the originals.


The two 3/4" pieces of marine ply have been cut and epoxied together. It then was notched to align with the 13 degree angle of the transom so the baitwell's outer back wall will fit flush in the inside.


After mounting, the new transom is glassed inside and out. Notice the vertical Knees and Parallel support. This new transom is solid now!


Fiberglass drain tubes will be inserted and glassed in later


Old holes are ground and glassed. The next step will be a lot of faring. Notice the top cap has been cut straight. a new lip will be formed to align the new transom cap and rub rail.


Yes my boat too used to be that nasty mustard yellow [img]/images/graemlins/frown.gif[/img]
__________________


1978 23' Superfish/Potter Bracket 250HP --------


as "Americans" you have the right to ......
"LIFE, LIBERTY and the PURSUIT of a Classic SeaCraft" -capt_chuck
Reply With Quote
  #40  
Old 12-22-2004, 08:28 PM
ocuyler ocuyler is offline
Senior Member
 
Join Date: May 2002
Location: 44.41 -75.79
Posts: 1,490
Default Re: Potter Bracket

Capt. Chuck,

Looks terrific! You're over the hump. Nice project considering the bandwidth you're using... Hope to see the finished product in person sometime in Feb.
__________________
Otto
And yes, I still believe in the four boat theory...
Reply With Quote
Reply


Posting Rules
You may not post new threads
You may not post replies
You may not post attachments
You may not edit your posts

BB code is On
Smilies are On
[IMG] code is On
HTML code is Off

Forum Jump


All times are GMT -4. The time now is 11:15 AM.


Powered by vBulletin® Version 3.8.7
Copyright ©2000 - 2025, vBulletin Solutions, Inc.
All original content © 2003-2013 ClassicSeacraft